

If you’re ready to switch from DocuSign, you’re probably concerned about your existing templates and documents. The idea of starting from scratch can feel like a dealbreaker, which is why many users remain stuck with DocuSign’s bloated features and expensive price tiers.
Fortunately, migrating to another eSignature provider (like SignWell) is a straightforward process. In a few steps, you can bring your documents and templates over without losing your work.
This guide walks you through the process of exporting your DocuSign templates to getting them fully set up and ready to use in SignWell.
Before You Migrate: What to Prepare
Before you start moving your data to a DocuSign alternative, it’s smart to take some preparation steps.
Get Admin Access to Your DocuSign Account
You’ll need admin-level permissions to access and export templates, especially if your organization has multiple users or shared template libraries. If you’re not the account admin, contact whoever is.
Treat Signed Documents and Templates Separately
Signed documents should be downloaded and stored for compliance, regardless of whether you’re switching providers. Download signed documents as certified PDFs and save them to a secure location.
Templates, on the other hand, are working documents you’ll actively rebuild in SignWell, so place them somewhere you can access.
Export Everything Before You Cancel
Once your DocuSign account is closed or downgraded, you may lose access to your templates and documents. Do a full export before you make any changes to your subscription. It’s smart to give yourself a few buffer days in case you have to return to the DocuSign account for something.
Audit and Prioritize Your Templates
Most organizations have templates they use every day, and some they haven’t touched in years. Before migrating everything, consider what’s actually worth bringing over. Use the migration as an opportunity to retire anything outdated or redundant. This will make your SignWell account easier to manage.
Sign up with SignWell
Before you start importing, make sure your SignWell account is active, your team members are invited, and your settings are configured. Open a SignWell account and learn how to get started.
How to Export Your Templates from DocuSign
Before you can set anything up in SignWell, you need to pull your templates and documents out of DocuSign. There are two things you’ll want to export: the template files themselves and any completed, signed documents you need to retain. This section covers both.
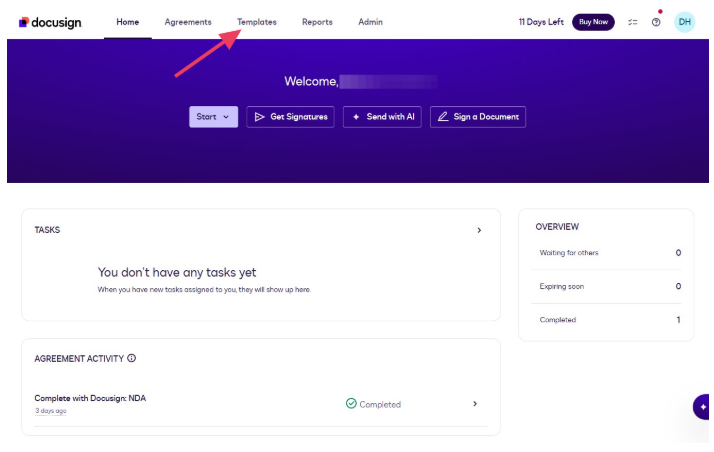
Step 1: Log In and Navigate to Templates
Log in to your DocuSign account. From the main navigation, click Templates in the top menu. This will bring up your full library of saved templates.
Step 2: Locate the Template You Want to Download
Use the search bar or browse the list to find the template you want to export. If you have a large library, use the filter options to sort by owner, date modified, or folder to make this easier.
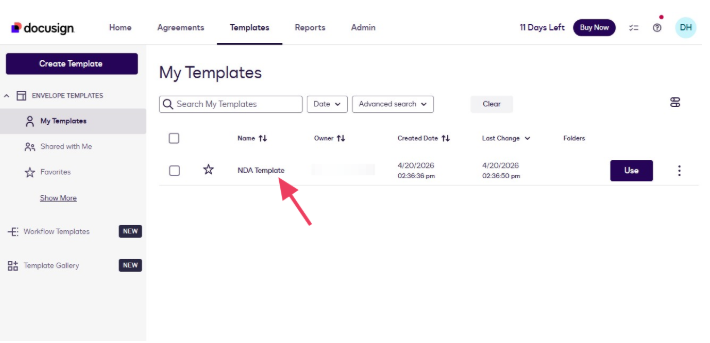
If your organization has templates owned by other users, you may need to filter by Shared Templates.
Step 3: Download the Template
Click the actions menu (typically a three-dot or dropdown icon) next to the template name and select Download. DocuSign will save a ZIP file containing the template in JSON format to your downloads folder.
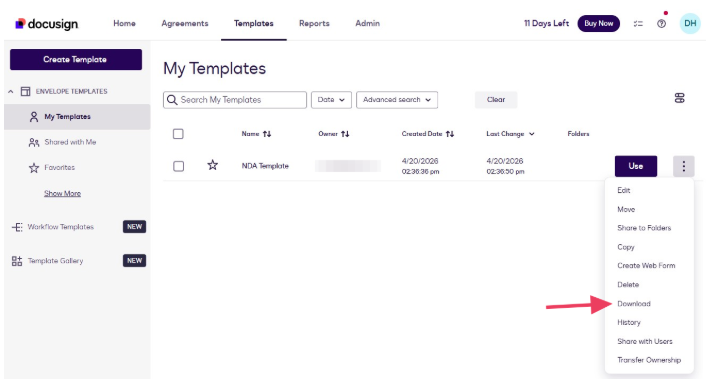
Repeat this step for each template you want to migrate.
Important: This file is a DocuSign-proprietary format. It can be re-uploaded into another DocuSign account, but it is not compatible with SignWell or other eSignature platforms. What you actually need is the PDF version, which is covered in the next step.
Step 4: Download the Document as a PDF
Navigate to your Agreements tab. Click the Download button next to the document you want to export.
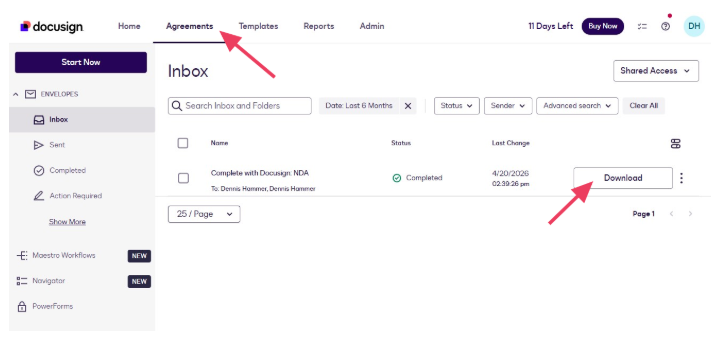
An overlay will appear where you can choose what to download. Download anything you like for your records, but you need the “Document” file to upload to SignWell. Repeat this step for all agreements you need to migrate.
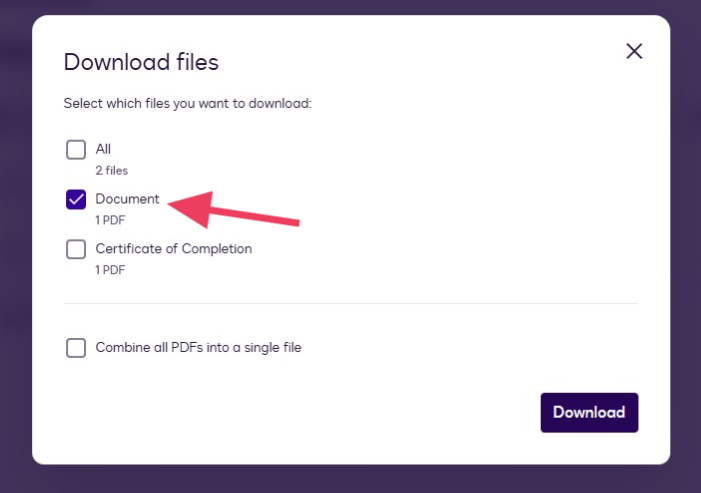
If you’re just downloading to store the files, consider downloading the envelope as a single PDF file.
How to Import Your Templates into SignWell
Now that you have your source documents ready, you can rebuild each template in SignWell. One thing to set expectations on before you start: nothing carries over automatically. Your signer roles, field placements, signing order, and required-field settings all need to be recreated in SignWell. The good news is that SignWell’s template builder is fast enough that most templates take only a few minutes, and once you’ve done one, the rest go quickly.
Step 1: Open your templates dashboard
Log in to your SignWell account. From the main navigation, click Templates to open your Templates dashboard. This is a different view from your Documents dashboard, which is where individual sent documents live.
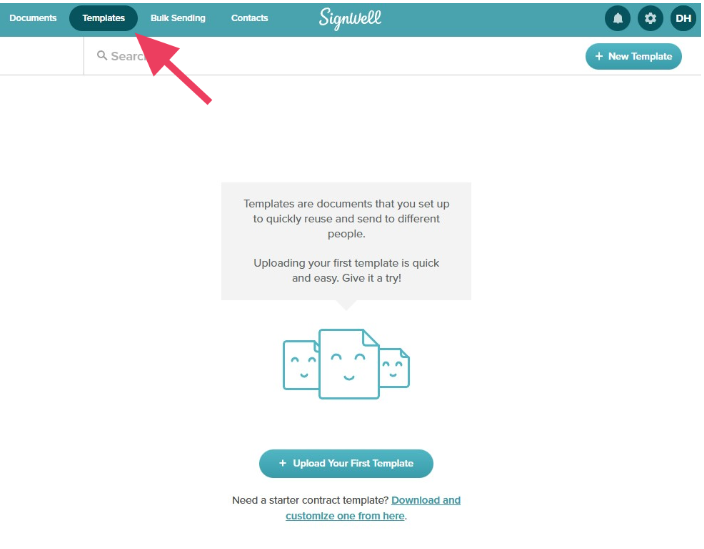
Step 2: Create a new template
Click Upload Your First Template if this is your first template, or New Template if you’ve already created templates. You’ll be prompted to upload a file.
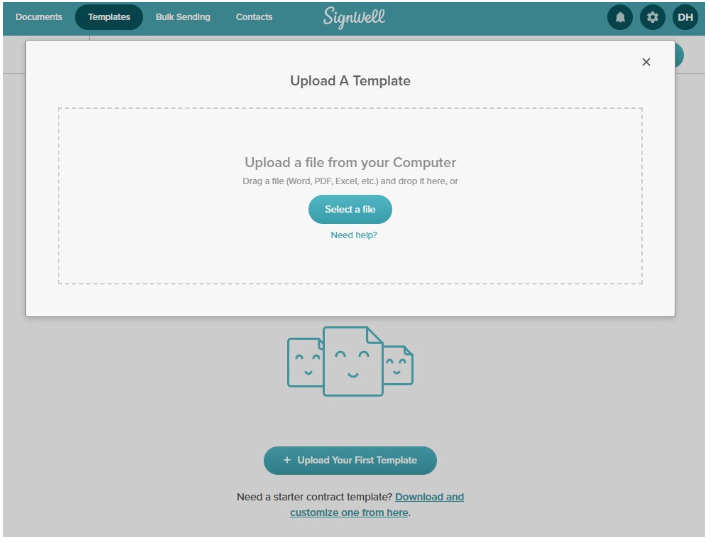
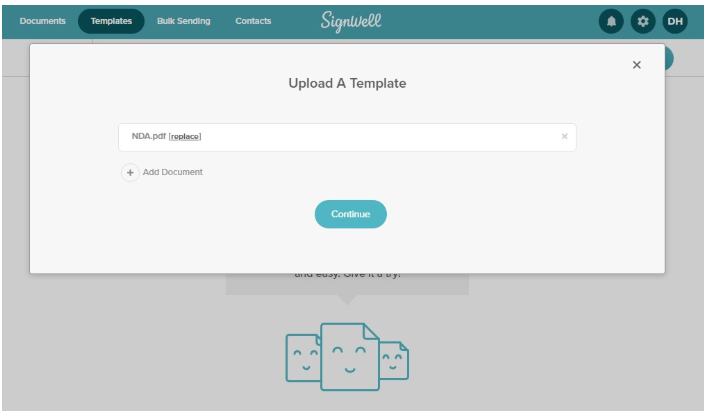
Step 3: Upload your source document
Select the PDF or Word file you prepared in the export step. SignWell accepts PDF, Word, PowerPoint, Keynote, Excel, Pages, Numbers, and common image formats, and files must be under 50MB. Click Continue to move on.
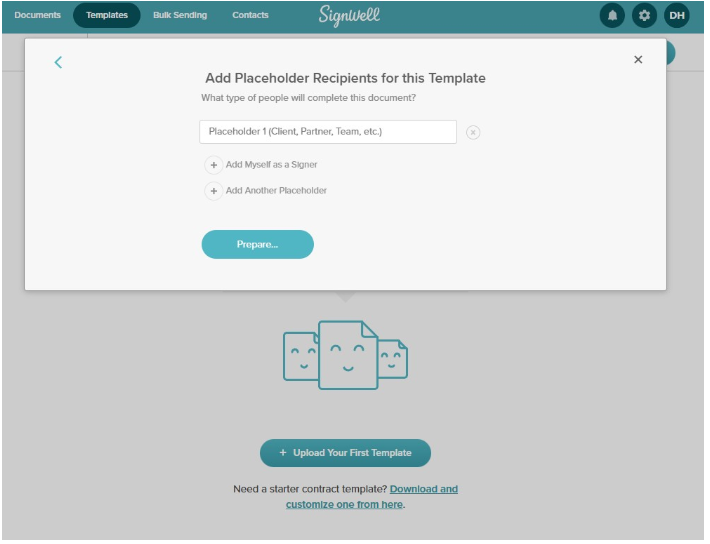
Step 4: Add your signer placeholders
Before placing any fields, define who will sign the document. SignWell calls these signer roles placeholders and stands in for the people who’ll eventually receive the template, such as “Client,” “Contractor,” or “Employee.” You can also add yourself or a teammate as a placeholder if someone internal needs to countersign.
Add one placeholder for each person who needs to sign or complete part of the document. You’ll assign every field to one of these placeholders in the next step, so make sure you’ve accounted for every role before moving on. When you’re done, click Prepare.
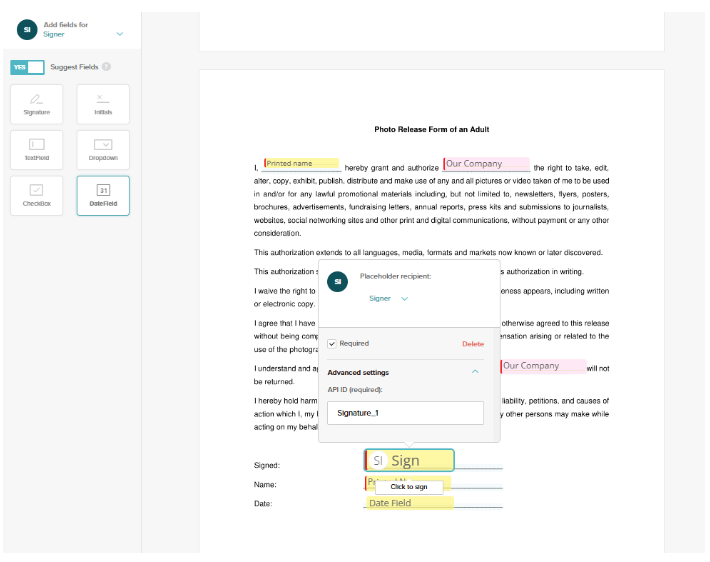
Step 5: Place and assign your fields
This is where you recreate the field logic from your original DocuSign template. Use the drag-and-drop editor to place fields wherever input is required. SignWell supports:
- Signature for capturing a signer’s signature
- Initials for initialing specific sections
- Date for signing dates
- Text for names, addresses, and other typed input
- Checkbox for yes/no selections or option groups
- Dropdown for multiple-choice fields
For each field, use the dropdown next to the field to assign it to the correct placeholder. You can also toggle each field as required or optional. If your original template used a specific signing order (for example, the client signs before the manager), set that now using the placeholder order at the top of the editor.
Step 6: Save the template
Once your fields are placed and assigned, click Finish Template. You’ll be prompted to set the sending defaults, including the default email subject and message. Fill these in and click Save Template. Your template is now live in SignWell and ready to use.
Step 7: Send yourself a test before using it with clients
Before you send any real agreements, run a test on every template you migrated. Send the template to yourself as the first signer and walk through the full signing experience. Check that:
- Every field from your DocuSign template is present and placed correctly
- Each field is assigned to the right placeholder
- Required fields are actually marked as required
- The signing order works as expected for multi-party documents
- The document renders correctly at every stage of the flow
A few minutes of testing saves you the awkwardness of having to catch a misplaced signature block after you’ve already sent the agreement to a client.
What About Your Signed Documents?
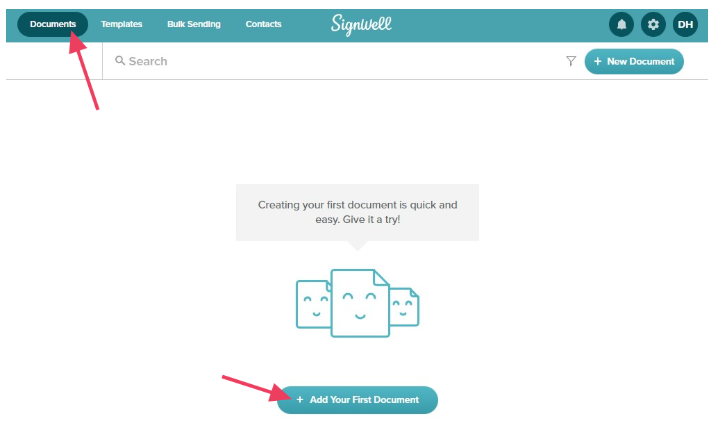
If you want to import completed/signed documents to SignWell, simply visit the Documents page and click Add Your First Document or + New Document.
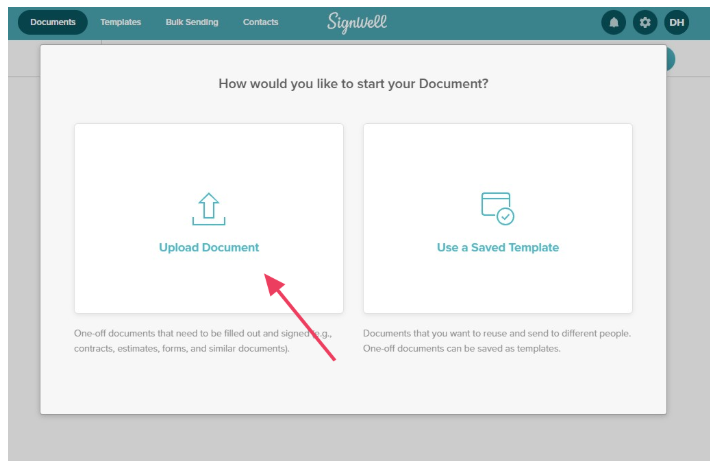
Then click Upload Document and follow the prompts to choose your file.
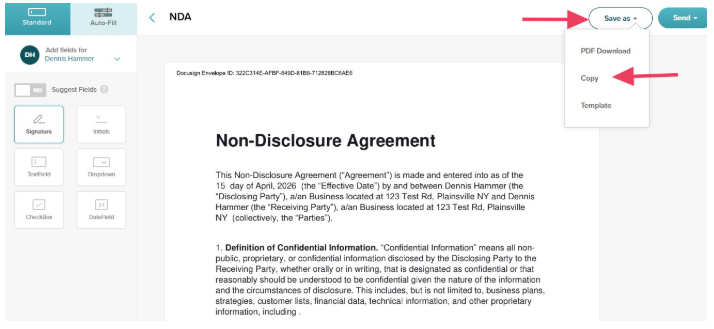
In the document editor, click Save As > Copy.
The document will appear in the list on your Documents page.
Why Teams Are Choosing SignWell After DocuSign
If you’ve made it this far, there’s a good chance DocuSign is more than you need and more than you are willing to pay for. DocuSign is packed with enterprise features most small and mid-size businesses never touch, with per-user and envelope-based pricing that punishes volume.
SignWell was built for teams who want electronic signatures to be simple and inexpensive. What makes it a great tool to migrate from DocuSign?
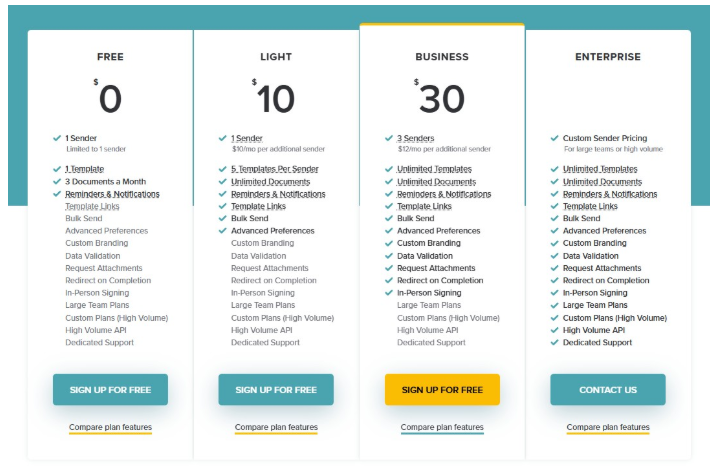
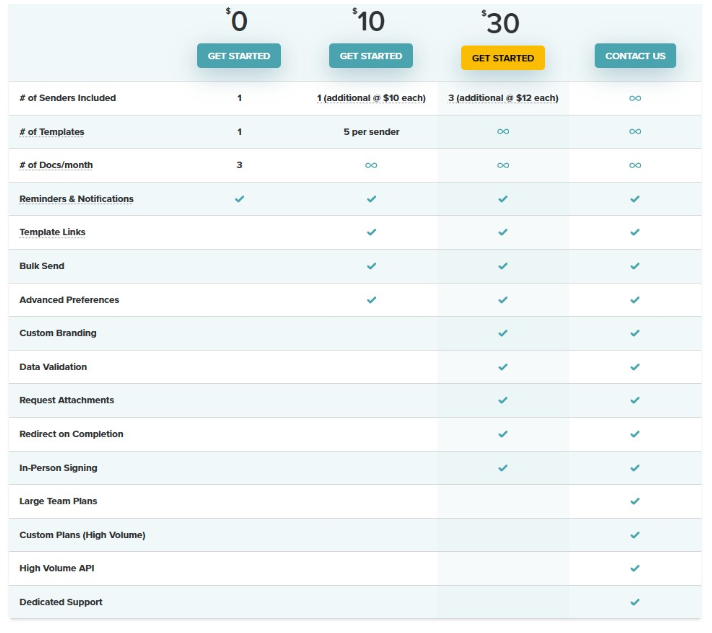
Simple and reasonable pricing: SignWell’s paid plans include unlimited documents. You aren’t charged per envelope or per signer. There are no contracts and no cancellation fees. You can pay monthly and cancel anytime.
Easy to use from day one: SignWell’s interface is consistently praised for its clean, intuitive design. This is super important when you’re onboarding a team or teaching your workflow to someone who isn’t technical. You spend less time training and make fewer mistakes.
All of the features you need: SignWell covers the core features that growing businesses rely on: reusable templates, bulk sending, audit trails, and a powerful API for teams that want to embed signing into their own tools and workflows. It’s SOC 2 Type II certified and supports GDPR, HIPAA, and ESIGN compliance requirements, so you’re not giving up anything on the security and legal validity front.
Trusted by businesses like yours: SignWell is trusted by over 65,000 businesses who made the same decision you’re considering. It’s a proven platform that’s simply priced and sized the way most companies need.
SignWell offers a free plan that’s perfect for businesses with light needs. It’s also a great way to explore the app. Learn more about SignWell pricing.
Ready to Make the Switch?
Migrating from DocuSign doesn’t have to mean starting over. With the right preparation, you can have your SignWell account fully up and running faster than you’d expect. The teams that make this switch don’t look back.
Start your free SignWell account today and bring your first template over in minutes.