

For many organizations, document signing is still a bottleneck.
Contracts and proposals sit in inboxes waiting for review. Agreements move back and forth as email attachments, sometimes printed, signed, scanned, and returned. Signers must access and log in to yet another app.
In the age of digital workflows, this manual signing process is inefficient.
eSignature APIs solve this problem by embedding electronic signature functionality directly into your applications, websites, and internal systems. Instead of sending users to an external tool, you can integrate signature workflows into your existing product experience.
In these environments, signature requests are triggered automatically. Completed documents are stored and managed within the system that created them.
This guide is for developers, technical architects, CTOs, and IT decision-makers who want to embed eSignatures into their platforms. You’ll learn how the eSignature API integration works and how to implement it in your environment with a developer-friendly solution like SignWell.
What is eSignature API Integration?
eSignature API integration is the process of embedding electronic signature features directly into your application, website, or internal system using an application programming interface (API).
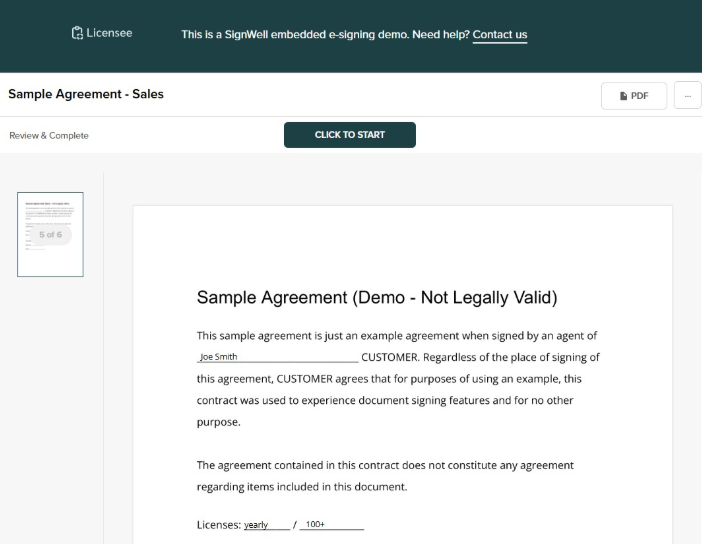
Here’s a sample of Signwell’s eSignature function embedded into a third-party app.
How eSignature API Works
Instead of manually uploading documents to a separate signing platform, your software communicates with an eSignature provider to create documents, send signature requests, track status updates, and retrieve completed documents via API calls.
At a high level, the integration works like this:
- Your application generates or uploads a document.
- Your system sends a request to the eSignature API to create a signing session.
- The API returns a document ID and a signing URL.
- Signers complete the document (either embedded in your app or via a secure link).
- Webhooks notify your system when the document is viewed, signed, or completed.
- Your application automatically retrieves and stores the finalized document.
How This Differs From Standalone eSignature Platforms
Standalone eSignature platforms require users to leave your workflow, manually upload documents, configure signers in a separate dashboard, and track status outside your system.
API integration eliminates many of those steps by embedding the signing experience directly into your application and automatically syncing document data.
Types of eSignature APIs
Most modern eSignature providers offer two types of APIs:
1. REST APIs (Representational State Transfer)
REST APIs use standard HTTP methods (GET, POST, PUT, DELETE) and exchange data in JSON format. They are lightweight, easy to integrate, and compatible with virtually every modern programming language and framework. REST is now the industry standard for eSignature API integration due to its simplicity and scalability.
2. SOAP APIs (Simple Object Access Protocol)
SOAP APIs use XML-based messaging and follow strict protocol definitions. They were more common in older enterprise systems and can still be found in legacy integrations. However, SOAP is more complex to implement and maintain compared to REST.
Today, most developers choose REST-based eSignature APIs because they align with modern web architecture and microservices design.
Why Businesses Need eSignature Integration
Beyond the traditional benefits of eSignatures, document signing is directly tied to your revenue, compliance, onboarding, procurement, and vendor management. When signatures are delayed, business outcomes are delayed as well.
With electronic signature integration, what was previously a manual checkpoint becomes a programmable part of your workflow. For technical teams, this means automation and system control. For business leaders, it means faster cycles, better visibility, and measurable ROI.
Let’s look at the core reasons companies invest in API-based eSignature integration.
1. Streamline Workflows and Reduce Contract Turnaround Time
With eSignature API integration, documents are generated, sent, and tracked automatically within your system. There’s no need to manually upload contracts or assign signers.
Example: When a sales opportunity is marked “closed/won” in a CRM, the system can automatically generate a contract, send it for signature, and update the deal status once it is completed. No manual follow-up is required.
2. Improve Customer and User Experience
With API integration, signing happens directly inside your application rather than redirecting users to a third-party platform. This creates a seamless experience that feels native to your product.
Example: An HR onboarding portal can present employment agreements directly within the dashboard. The new hire reviews and signs documents without leaving the platform. This reduces friction and increases completion rates.
3. Enhance Security and Compliance
By centralizing document handling, an integrated eSignature API provides built-in security features, including encrypted transmission, audit trails, and tamper-evident document sealing. Every action is recorded and verifiable.
Example: A financial services platform can automatically store signed agreements along with detailed audit logs, making it easier to demonstrate compliance during regulatory reviews.
4. Scale Efficiently as Volume Grows
API-based integration enables document workflows to scale as work volume increases. Your system can create and send large numbers of documents without increasing administrative workload.
Example: A lending platform can automatically generate and send loan agreements for every approved application. Whether processing 50 or 5,000 approvals per day, the same integration handles the volume consistently.
Core Features to Look for in an eSignature API
When you’re considering an eSignature tool with an API, features matter less than how they fit into your architecture. Developers need control, reliability, and flexibility. Technical decision-makers need it to be compliant, scalable, and maintainable.
Make sure any eSignature tool you consider offers the following features:
1. Comprehensive Signing Workflow Management
The API should allow you to manage the full document lifecycle. This should include…
- Creating documents
- Defining signer roles and order
- Setting expiration dates
- Sending reminders
- Tracking document status
Most importantly, the workflow logic should be configurable through API calls. You should never need to visit the app’s dashboard.

2. Multiple Signature Types and Authentication Methods
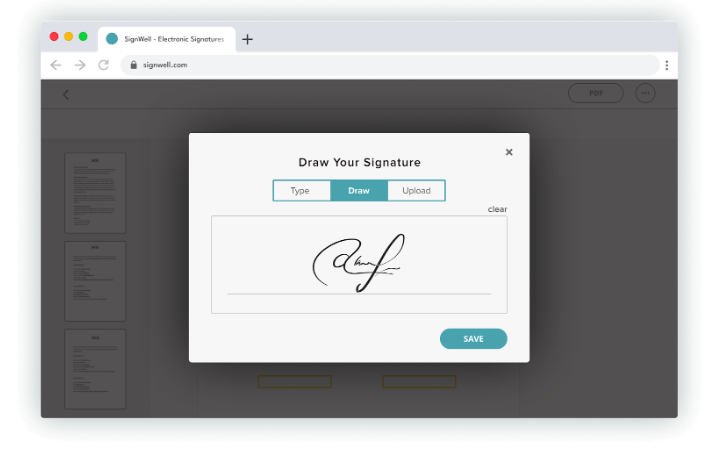
Look for multiple supported signature types, such as typed, drawn, and uploaded signatures, along with configurable authentication options. The API should allow you to enforce identity verification methods appropriate for your needs without disrupting the user experience.
3. Flexible Embedding Options
An eSignature API should support embedded signing flows. You should be able to generate secure signing sessions that integrate directly into your application interface so you have control over the user journey and can eliminate any unnecessary redirects.
4. Robust Audit Trails and Compliance
The API must automatically generate detailed audit trails for every document. This includes timestamps, IP addresses, document integrity verification, and tamper-evident records. Compliance support for regulations such as ESIGN, UETA, and eIDAS should be built into the platform.
5. Webhook Support for Real-Time Updates
Webhooks are essential for production-grade integrations. The API should send event notifications when document states change, enabling your system to respond immediately.
6. Quality API Documentation and SDKs
You’ll need comprehensive documentation to make integration easy. Look for developer-friendly information, including clear endpoint references, authentication guides, error code explanations, and language-specific SDKs.
7. Customization and Branding
The API should allow you to customize emails, branding elements, and signing interfaces. This way, the signing experience will align with your product and maintain user trust throughout the workflow.
Step-by-Step Guide: How to Integrate eSignatures Using Signwell’s API
This guide walks you through the complete setup process using SignWell’s API. We’ll use JavaScript throughout since embedded signing requires frontend integration, but the HTTP concepts translate to any backend language.
(If you decide to use a different eSignature provider, review its API documentation to make sure it follows industry standard eSignature best practices and supports your needed workflow.)
Step 1: Set Up Authentication and API Access
Before you can send documents for signature, you need to obtain your SignWell API credentials. The setup process is straightforward, and you can start testing immediately.
Sign up for a SignWell account. The free account includes unlimited test usage and up to 25 free documents per month.
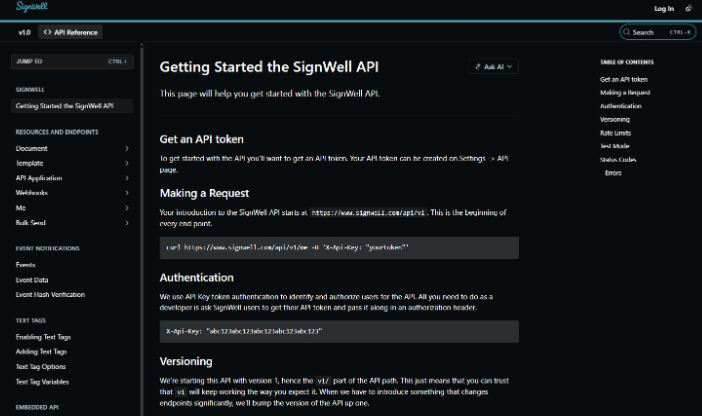
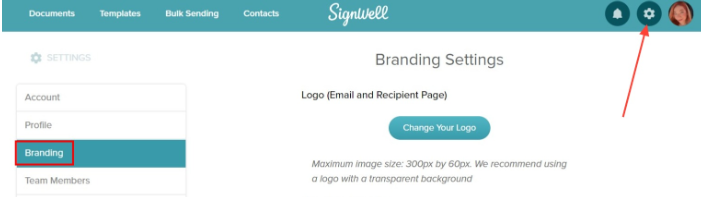
Once you’re logged in, navigate to Settings → API in your dashboard. Click Create API Key to generate your authentication token. Store this key securely as you’ll use it in all your API requests.
SignWell uses API key authentication with the X-Api-Key header. All API endpoints start with https://www.signwell.com/api/v1/.
Here’s how to set up your API client:
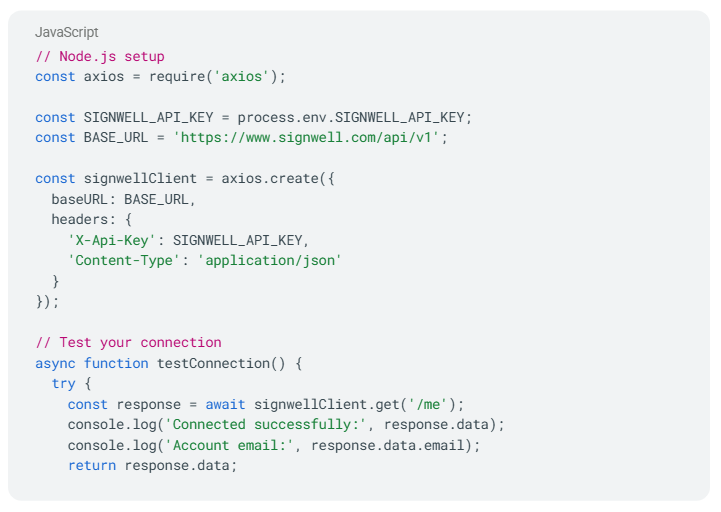
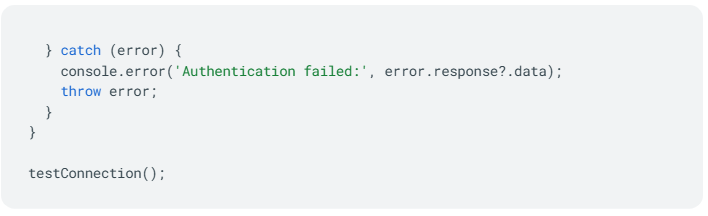
Rate limits are 100 requests per 60 seconds for most operations, with a lower limit of 20 requests per minute in test mode. Enable test mode for all requests during development by setting test_mode: true in your API calls until you’re ready to go live.
Step 2: Prepare and Upload Your Document
SignWell offers two main approaches for creating documents: using pre-built templates or leveraging text tags embedded in your PDFs. While templates are the most common API workflow, text tags give you flexibility when you need a dynamic document.
Using Templates (Recommended Approach)
Templates are ideal for sending the same document repeatedly. First, create your template through SignWell’s web interface by uploading a PDF and placing signature fields visually. Once saved, you’ll get a template ID that you can use.
Here’s how to create a document from a template:
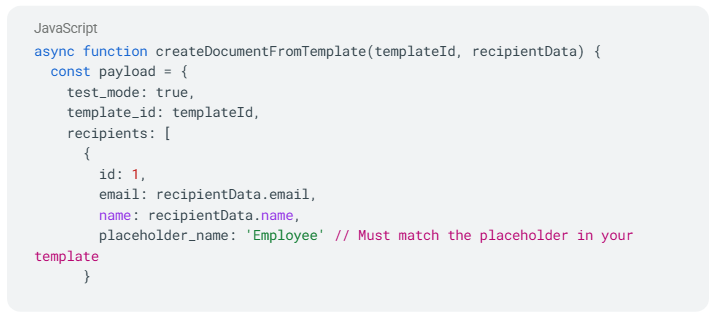
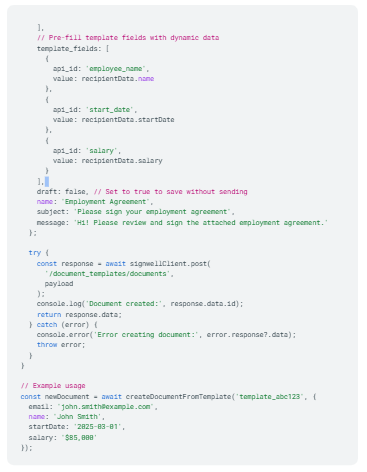
The placeholder_name in your recipients array must match the placeholder names you defined when creating the template in SignWell’s interface. The template_fields array lets you pre-fill specific fields with dynamic data.
Step 3: Using Text Tags for Dynamic Documents
Text tags are placeholders that start with {{ and end with }}; SignWell converts them into signature fields. This approach works well when you’re generating PDFs and want to define signature fields without manually creating templates.
Here’s how text tags work:
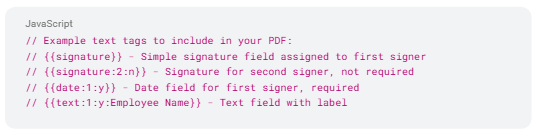
When creating a document with text tags enabled:

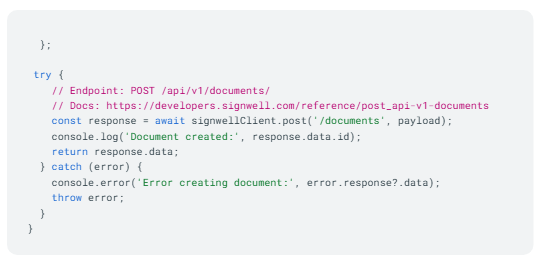
Step 4: Embed the Signing Experience
The embedded signing process requires two steps: getting an embedded signing URL from SignWell’s API, then displaying it using SignWell’s JavaScript library.
Getting the Embedded Signing URL
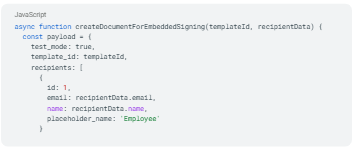
First, you need to obtain an embedded_signing_url for your document. You’ll receive this URL when creating a document, or you can retrieve it from an existing document.
When creating a document from a template with embedded signing in mind:
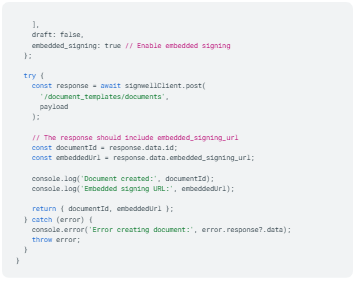
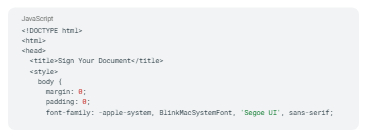
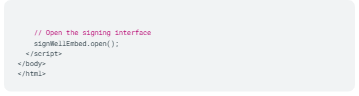
Displaying the Signing Interface
Once you have the embedded_signing_url, display the document for signing using the SignWell JavaScript library. First, add the SignWell script to your page:
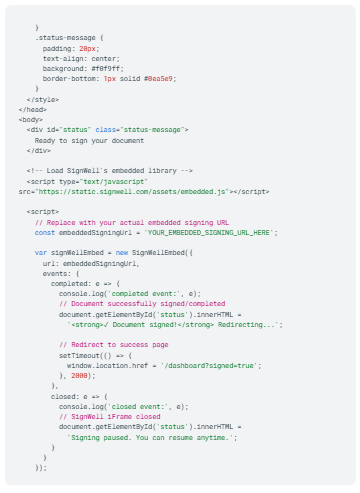
There are multiple options and events you can use when creating the SignWellEmbed object. The two primary events are:
- completed – Triggered when the document is successfully signed.
- closed – Triggered when the signer closes the SignWell iframe without completing.
Step 5: Set Up Webhooks for Real-Time Status Updates
Webhooks notify your application instantly when documents are viewed, signed, or completed, eliminating the need to constantly poll the API for status updates.
This is essential for triggering automated workflows, such as sending confirmation emails, updating your database, or advancing multi-step processes.
Understanding SignWell’s Webhook Events
SignWell sends document events for Document Sent, Viewed, Signed, Reminder Sent, Completed, and Declined. The API statuses align directly with API events, which you can subscribe to via webhooks. When one of these events occurs, you’ll receive a notification reflecting the document’s status changes.
Registering a Webhook
To register a webhook, POST to

with a callback URL where SignWell will post document events. Here’s how to set it up:
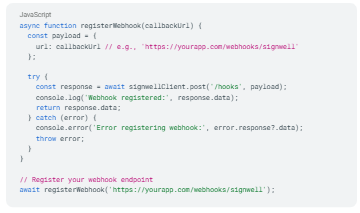
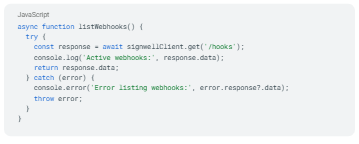
You can also list all existing webhooks in your account:
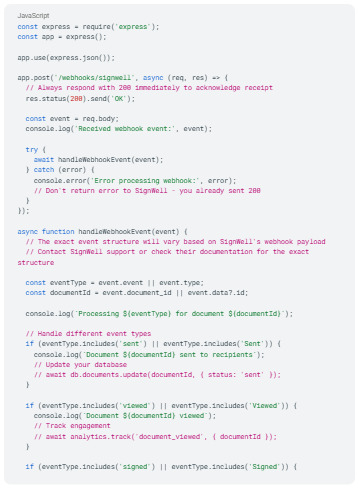
Creating Your Webhook Endpoint
Now create an endpoint in your application to receive webhook notifications from SignWell:
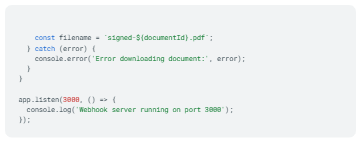
Testing Webhooks Locally
For local development, use ngrok to expose your localhost to the internet so SignWell can reach your webhook endpoint:
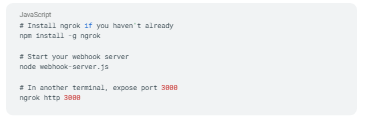
Copy the HTTPS URL that ngrok provides (e.g., https://abc123.ngrok.io) and register it as your webhook URL in SignWell. You can then test by creating and completing documents in test mode.
Step 6: Retrieve Completed Documents and Audit Trails
Once all parties have signed, download the completed PDF and its audit trail for your records. The audit trail provides legally significant proof of who signed what and when.
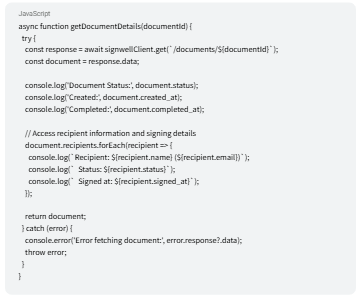
Getting Document Details and Status
You can retrieve a document and all associated document data by supplying the unique document ID from either your document creation request or the document page URL:
Understanding the Audit Trail
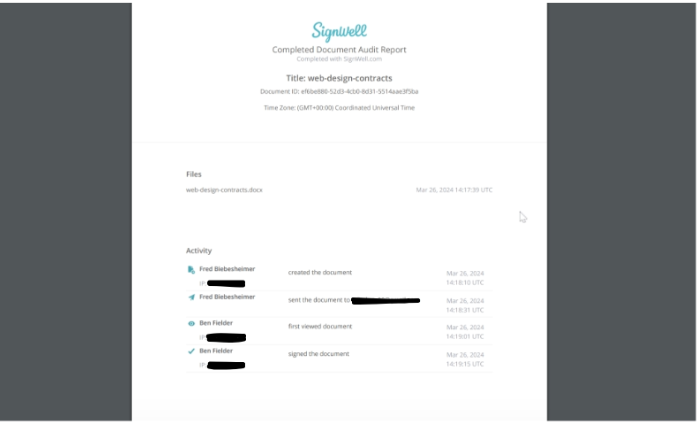
SignWell includes an “Audit & Lock” feature that adds a page at the end of your document containing an audit trail of the signing process, including names, email addresses, IP addresses, timestamps, and more. The final PDF is locked and encrypted with a digital certificate, preventing any tampering with the signed document.
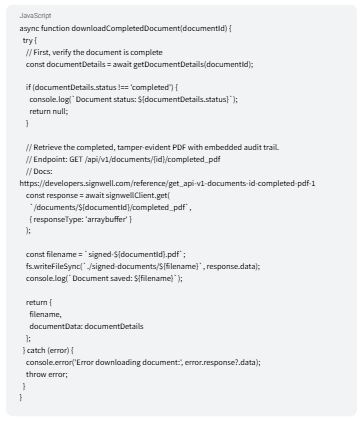
Downloading Completed Documents
Once a document is fully signed, SignWell gives you two ways to access the completed PDF.
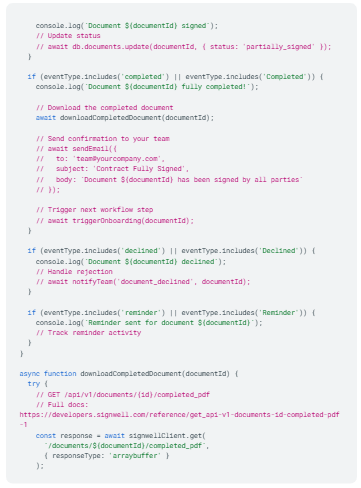
Option 1: Stream the PDF directly
Call the Completed PDF endpoint to retrieve the binary PDF file. This is the best approach for server-side workflows that require saving the file to local storage or a cloud bucket, such as S3 or Google Cloud Storage, immediately.
Option 2: Retrieve the PDF URL from the document details response
When you call GET /api/v1/documents/{id}/, the response includes a completed_pdf_url field once signing is complete. This is useful when you want to store a link in your database, pass it to a front-end download button, or send it to a user — without handling binary data on your server.
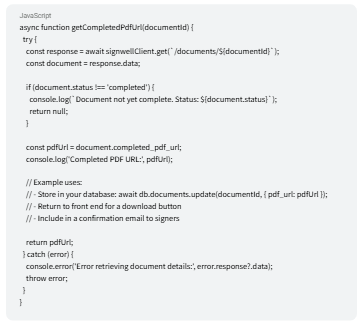
Choose the approach that fits your workflow. If you’re automating document storage or archiving in a webhook handler, streaming the binary PDF directly (Option 1) keeps everything server-side and avoids an additional API call. If you’re building a user-facing download experience or simply need to record the file location, the URL from the document details response (Option 2) is the simpler approach.
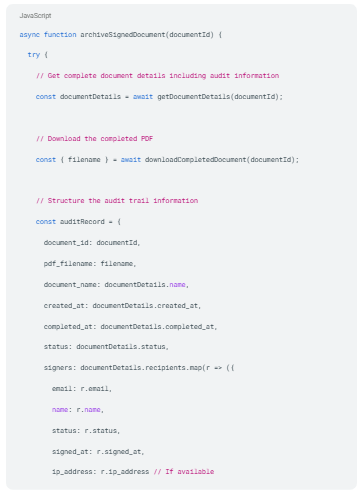
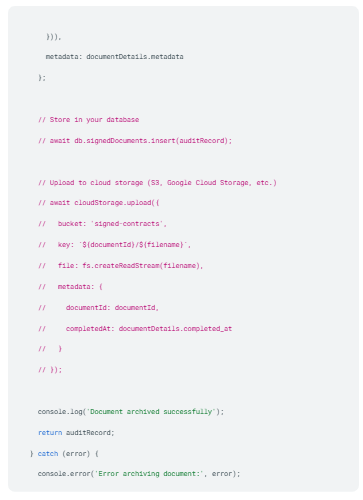
Archiving Documents with Full Audit Information
For production applications, implement a comprehensive archival workflow that captures both the signed PDF and all audit trail data:
Real-World Use Cases: eSignature Integration Across Industries
Electronic signature integration is most valuable when it is directly tied to a core business workflow. Across industries, signatures are often the final step before revenue is recognized, employees are onboarded, or transactions are completed. Embedding those signing capabilities into your in-house platforms removes delays and manual coordination.
Below are common implementation patterns across industries.
1. SaaS Platforms: Automated Subscription Agreements
SaaS companies often issue subscription agreements after a deal closes or a pricing tier is selected. With API integration, the platform can automatically generate a contract from account data, send it for signature, and activate the subscription once it is signed.
2. HR Systems: Employee Onboarding Automation
HR platforms manage offer letters, NDAs, tax forms, and policy acknowledgments. Through API integration, onboarding workflows can create new documents and signature requests immediately upon a candidate’s acceptance of an offer. Documents are stored in the employee record.
3. Real Estate Platforms: Digital Lease and Purchase Agreements
Real estate transactions involve multiple stakeholders and time-sensitive documents. eSignature integration allows lease agreements, purchase contracts, and disclosures to be generated, routed, and signed seamlessly. This simplifies coordination across brokers, buyers, sellers, and property managers.
4. Financial Services: Loan Applications and Account Opening
Financial services platforms rely on signed disclosures, loan agreements, and compliance documentation. API-based eSignature integration generates documents dynamically based on application data. Then it updates the account status and moves the application through underwriting or funding workflows.
5. Sales Teams: CRM-Integrated Contract Management
Sales teams often manage contracts through CRM systems. With API integration, the CRM can generate proposals or service agreements directly from opportunity data. When a contract is signed, the CRM automatically updates the deal stage, triggers billing setup, or notifies fulfillment teams. This tight integration reduces administrative work and shortens the sales cycle.
Why Choose SignWell for Your eSignature Integration
There are many eSignature API providers on the market. Most offer similar core functionality: document creation, signature capture, and audit trails. The difference comes down to developer experience, pricing clarity, integration flexibility, and how well the solution fits growing teams.
SignWell is the best eSignature software that’s designed to deliver the core capabilities businesses need without unnecessary complexity.
- Developer-Friendly API and Documentation: SignWell provides a clean, REST-based API with predictable endpoints and JSON responses. Clear documentation and practical examples reduce integration time and make it easier for developers to move from testing to production.
- Transparent, Scalable Pricing: SignWell offers straightforward, usage-based pricing that scales with volume. This makes it easy to forecast costs without committing to oversized enterprise contracts.
- Robust Security and Compliance: The platform supports encrypted transmission, secure storage, and detailed audit trails with tamper-evident records. It aligns with ESIGN and UETA requirements, providing a legally defensible signing framework.
- Flexible Integration Options: SignWell supports embedded and link-based signing workflows, enabling teams to design integrations that align with their existing architecture and user experience.
- Built for SMBs and Growing Companies: SignWell is designed for small and mid-market businesses that need reliable signing infrastructure without the complexity of implementation. It provides the capabilities teams need while remaining straightforward to integrate and manage.
Get Started with eSignature Integration Today
Manual signing slows down revenue, onboarding, and approvals. eSignature API integration brings embedded signing right into your existing systems.
If you’re ready to implement, start small. Choose a document type, set up API authentication, create a signing workflow, embed the experience, and test. From there, you can scale across use cases.
Want to add legally valid eSignatures to your product or service in less than a day? Integrate SignWell eSignatures into your website or web application with our API. It creates easy, secure, and affordable signature requests, embedded where you need them most.
Learn about the Signwell API and our security compliance features. Then start signing today!