How to Add a Signature Line in Word: Our Step-by-Step Guide
7 mins
Adding a signature line in Microsoft Word is straightforward, but it comes with limitations. Word’s built-in feature doesn’t include tracking, mobile access, or compliance tools needed for legally binding signatures. If your business needs more than a simple placeholder, SignWell offers a secure, professional alternative. This guide walks you through how to add a signature line in Word and explains when it makes sense to switch to a dedicated e-signature solution.
If you’ve ever sent a contract, invoice, or agreement through Microsoft Word, you know the drill: insert a line, hope the signer knows what to do, then wait days (or weeks) for it to come back. For professionals, these small delays add up. What should be a quick approval turns into a back-and-forth of emails, missing attachments, and printing and scanning documents.
While Word does offer a built-in signature line feature, it’s not built for the demands of modern business, embracing remote work and digital solutions. There’s no tracking, limited mobile access, and no way to ensure legal compliance, all must-haves for teams managing sensitive agreements or time-sensitive deals.
In this SignWell article, we’ll show you how to add a signature line in Word step by step, explain its limitations, and walk you through how tools like SignWell make document signing faster, compliant, and stress-free.
At SignWell, we’ve helped more than 65,000 teams simplify how they send, sign, and manage documents. We know the limits of Microsoft Word’s signature lines and how those gaps slow teams down. Our focus is on keeping things simple, secure, and legally compliant, so businesses can move faster without sacrificing accuracy or control. With built-in tracking, mobile access, and compliance with major e-signature laws, SignWell gives you everything Word’s basic tools can’t.
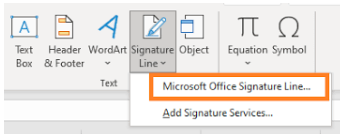
A signature line in Microsoft Word is a simple placeholder that shows where someone should sign a document, such as a contract, agreement, or form. You can add one from the Insert tab, but only in the desktop version of Word; the web app doesn’t support this feature.
However, Word’s signature lines are purely visual. They don’t include tracking, signer authentication, or legal compliance, all essential for professional, legally binding documents. In other words, a signature line in Word shows where to sign, but it doesn’t confirm who signed or protect the document from tampering.
That’s where dedicated e-signature tools like SignWell stand out. They go beyond placeholders by adding authentication, audit trails, and compliance with e-signature laws such as the ESIGN Act, UETA, and eIDAS, ensuring every signature is secure, verifiable, and legally binding.

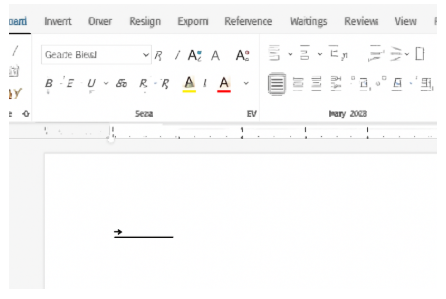
For informal or internal documents, you can create a simple underlined line to represent a signature line:
If you prefer to insert a scanned image of your handwritten signature:


Read our step-by-step guide on How to Quickly Create a Scanned Signature for Digital Documents.
Also, if you need to sign Word documents on Android or on iPhone, check out our detailed guide for a seamless process.
Microsoft Word’s signature lines are great for marking where a signature should go, but they lack the functionality most businesses need. E-signature platforms such as SignWell offer more complete solutions for secure and professional workflows.
Here are some of the advantages e-signature platforms bring:
Word’s built-in signature line works well for basic, low-risk documents like internal memos, non-binding approvals, or team acknowledgments. These files usually don’t require tracking, audit trails, or legal compliance. However, for contracts or client-facing documents, Word’s simplicity becomes a limitation.
When handling business contracts, legal agreements, or multi-signer workflows, it’s best to use a professional e-signature solution like SignWell. These platforms provide the security, tracking, and compliance features that Word lacks, helping your business maintain professional standards and meet legal requirements.
Before you create or send any document for signing, take a few minutes to plan the signing order, deadlines, and responsibilities. Knowing who needs to sign, when, and in what sequence helps prevent confusion and delays. Structured workflows are especially useful for multi-department approvals and client contracts. For more insights, read our guide to creating a digital signature workflow to learn how to organize approvals and streamline your signing process.
With remote work and a mobile-first business, signers expect to review and complete documents from any device. Choose a mobile-friendly signing solution that makes it easy to open, sign, and return documents without printing or scanning. This flexibility improves turnaround times and enhances the signer’s experience.
To protect your business, use e-signature tools that provide legally binding signatures, strong encryption, and detailed audit trails. These features not only meet compliance standards like ESIGN, UETA, and eIDAS, but also give you a clear record of every action taken on your document.
Once documents are signed, make sure they’re stored in a central, searchable system. Organized storage helps you quickly retrieve contracts, track renewal dates, and stay audit-ready. Platforms like SignWell automatically save signed files and maintain version history, so nothing gets lost or misplaced.
Adding a signature line in Microsoft Word can work for simple, one-off documents, but it often falls short when you need visibility, compliance, and efficiency. As your business grows, manual tracking and limited signing options can slow down approvals and create unnecessary bottlenecks.
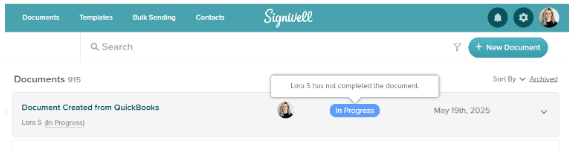
SignWell takes the frustration out of document signing by turning your Word files into secure, trackable e-signature workflows. With real-time updates, automated reminders, and compliance with ESIGN, UETA, and eIDAS, you get legally binding signatures and full control, all in one simple platform.
Make signing fast, professional, and effortless. Try SignWell for free today, no credit card required.
businesses served
customer support satisfaction
documents signed