
HubSpot is where your deals live, but the moment a contract or agreement needs a signature, everything stalls. You have to take the document out of your CRM and into the ether of back-and-forth emails, and then track it manually.
In this guide, you will learn what HubSpot can do natively with eSignatures and where its built-in tools limit you. You’ll also learn how to connect SignWell through Zapier so your documents get sent, signed, and logged directly back to HubSpot.
Ready to automate your contract workflow? Get started with SignWell today to send and track documents without leaving your sales process.
Does HubSpot Have Built-In eSignatures?
Yes, HubSpot has native eSignature capabilities, but only for quotes. The feature is powered behind-the-scenes by Dropbox Sign and requires a Revenue Hub Professional tier ($85/month/seat) or above.
While built-in quotes cover simple pricing agreements, HubSpot does not support electronic signatures on non-quote documents. That means you cannot natively send contracts, non-disclosure agreements, order forms, statements of work, offer letters, or anything else for electronic signature inside the CRM.
How to Send a Quote for eSignature in HubSpot
If you only need to sign standard price quotes, HubSpot handles the job in a few quick steps:
First, turn on eSignatures in your HubSpot settings by going to Settings, selecting Objects, clicking Quotes, and enabling the e-Signature option.
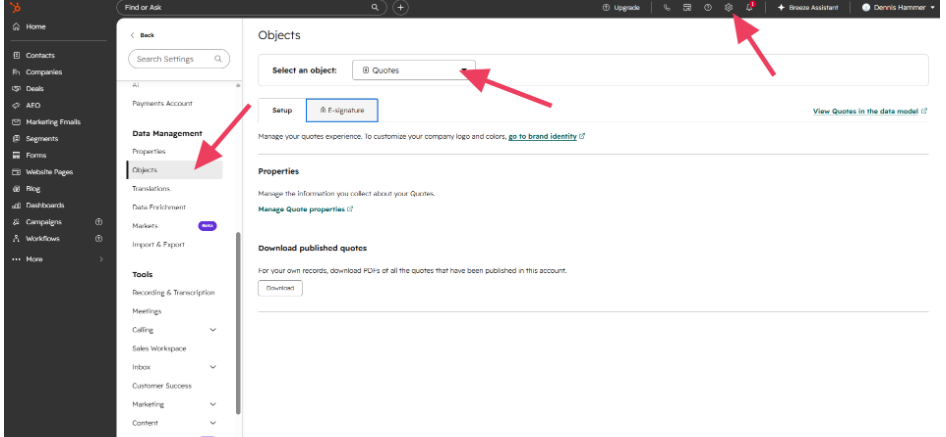
Then follow these steps:
- Open a Deal record in your HubSpot account.
- Find the Quotes card on the right sidebar and click + Add.
- Choose a quote template from the drop-down menu.
- Verify or edit the details.
- Set your expiration dates, comments, and signature/payment options.
- Click Review to preview.
- Click Publish to make it accessible as a page.
- Select Email quote to send it to the customer, or Copy link to paste the URL into a message.
Limitations of HubSpot Native eSignature
HubSpot’s native quote signing is convenient for quick deals, but it has limitations.
- It only works for quotes. You can’t attach custom legal terms, master service agreements, or standalone contracts to the signing workflow. This means you can only create a signable document from a Deal (one of HubSpot’s four record types). You can’t launch a document from a Contact, Company, or Ticket.
- There are limited signing rules. Advanced routing, specific signing orders, and detailed field placements for external documents are not supported. If you need to automate the order in which people sign a document, HubSpot simply can’t help you.
- No reusable contract templates. You cannot build a library of preset templates in HubSpot for your team to pick and send with a couple of clicks. Instead, you must manually recreate the document outside of HubSpot every time and re-upload it each time.
Why Connect an eSignature Tool to HubSpot
Connecting an eSignature tool gives your sales and revenue teams control over the deal process. Using a HubSpot eSignature integration unlocks several core advantages:
- Not just quotes! Send custom legal contracts, NDAs, statements of work, and onboarding paperwork from a single workflow.
- Pull deal information and contact details directly into your document fields automatically.
- Deals update themselves (and trigger workflows) when a document is signed.
- Sales reps and managers can check whether a document is sent, viewed, or completed without digging through inbox threads.
- Automatically store completed PDFs and legal audit logs directly on the associated record.
- Document tracking and automated reminders keep buyers moving without manual follow-ups.
How to Connect SignWell to HubSpot with Zapier in 5 Simple Steps
You can connect SignWell to Hubspot using a Zapier integration. Zapier acts as the bridge between both platforms: you choose a trigger event in one app and an action step in the other without writing any code.
To complete this setup, you need an active SignWell account, a HubSpot account, and a Zapier account.
Note that Zapier offers pre-built templates for SignWell and HubSpot, so you can launch common workflows in just a few clicks instead of building every step from scratch.
(If you prefer to use an app with a native connection, check out our Close CRM eSignature integration.)
Step 1: Build Your SignWell Template
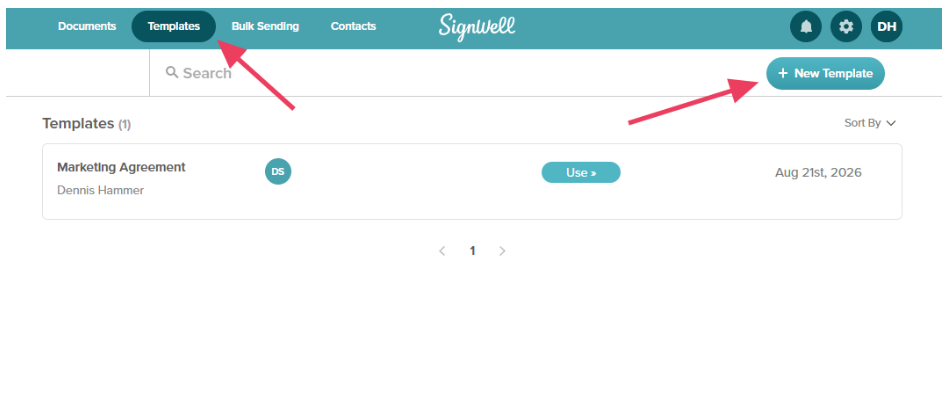
Log into your SignWell account and visit the Templates page and click New Template.
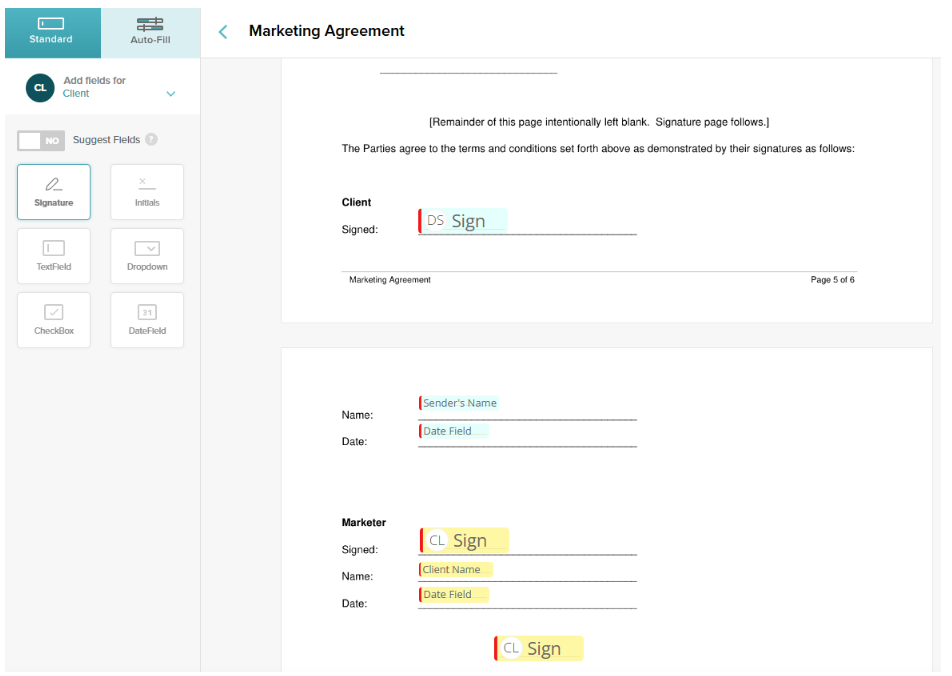
Add fillable fields for prospect names, company details, dates, signatures, and anything else that’s relevant to your contract. Assign clear field labels so Zapier can match your HubSpot CRM properties to the correct fields in SignWell.
Step 2: Create Your Zap
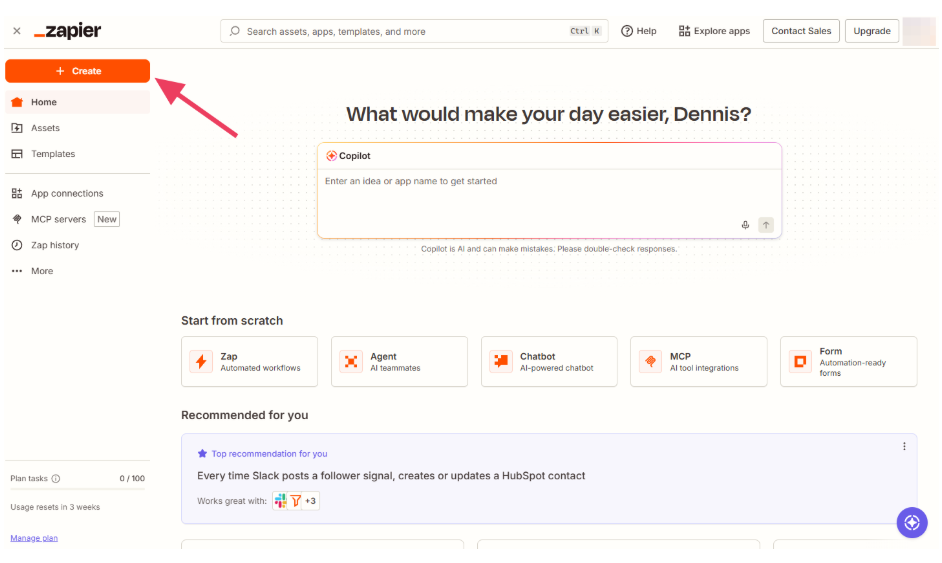
Log in to Zapier and click Create to make a new Zap (A “zap” is Zapier’s name for a custom automation).
In the Zap builder, you’ll need to make two choices: the trigger and the action.
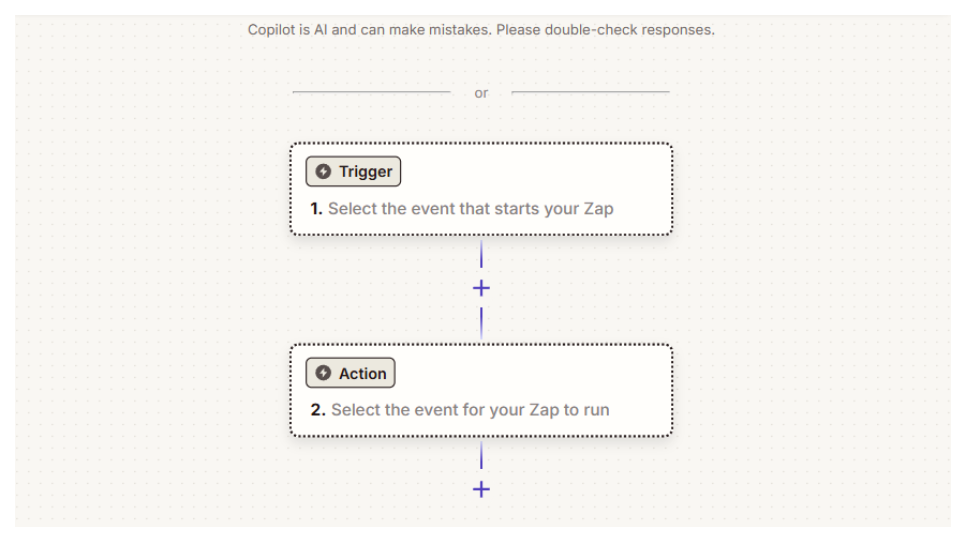
Step 3: Create Your Trigger
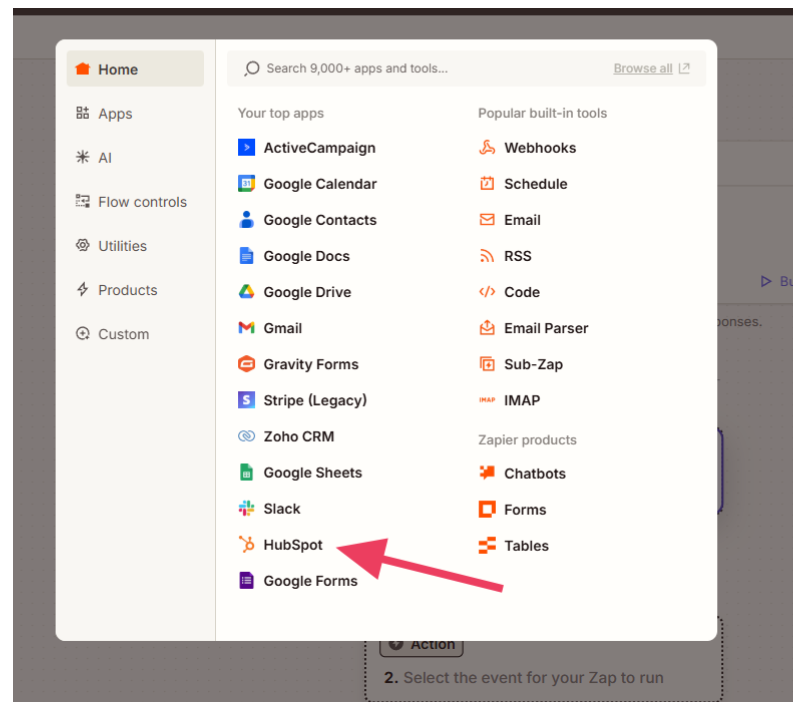
The trigger is the event that begins the sequence. In this case, it will be something that happens in HubSpot. Select the Trigger box and choose HubSpot from the menu.
In the sidebar that appears, select the appropriate trigger event in HubSpot, then connect your account. For the sake of this example, we’ll set our trigger to “New Contact,” which means the sequence will begin whenever a new contact is created in HubSpot. Press Continue.
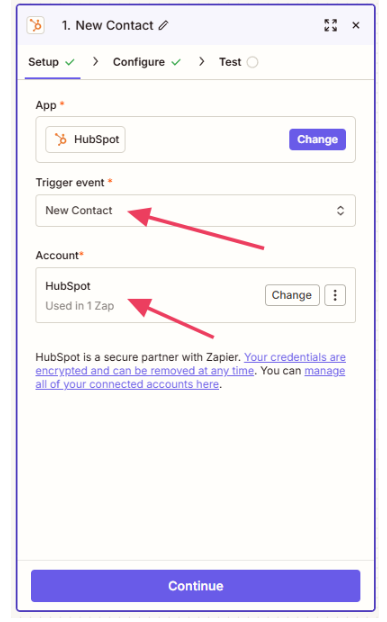
After pressing Continue, it’s a good idea to test the trigger to make sure the first part of the Zap is working.
Step 4: Create Your Action
Next, you’ll need to create the action. The action is the event that will occur when the trigger happens.
Click the Action box, search for SignWell, and choose it from the menu.
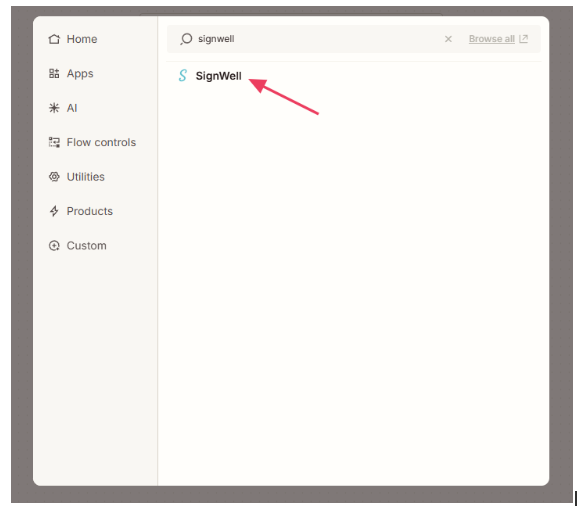
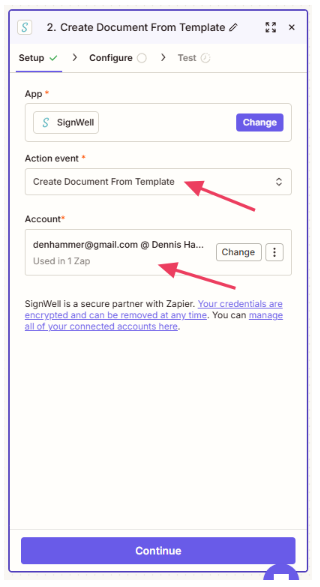
In the sidebar that appears, choose the “Create Document from Template” action and connect your account. This will generate a new document based on the template you’ll choose on the next screen. Press Continue.
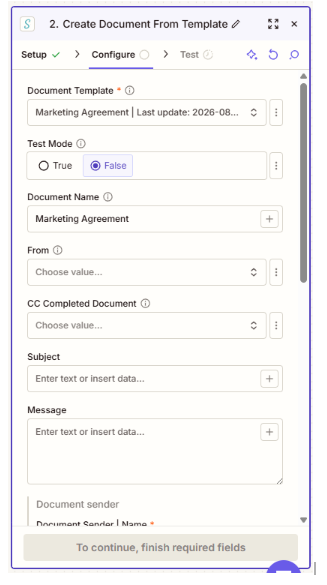
Next, go through each configuration option to match the action to the trigger. For instance, you’ll need to choose the appropriate template, identify the recipients of notification emails, and map the fields of the HubSpot contact to the document.
The exact requirements for this configuration step will vary depending on the type of trigger, the type of action, and the nature of the template. Go through them carefully.
Step 5: Test the Zap
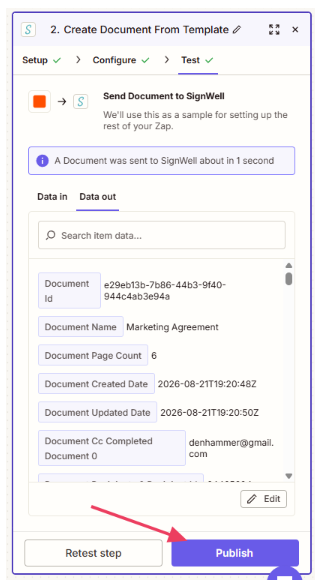
After configuring the settings, click the Test Step button. This will send test data from HubSpot over to SignWell.
Check your SignWell account to verify that a draft document was generated with the test details correctly filled in.
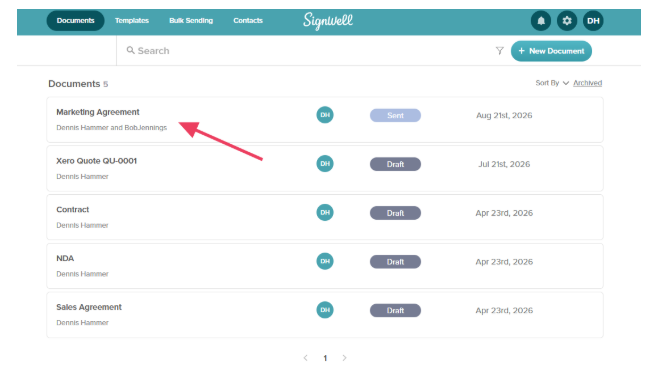
If you are the document sender, or if you used your own email address for the test, you should also receive a notification email. Follow the link in that email to open and test the document itself.
Step 6: Publish Your Zap
Once you confirm the data maps accurately, turn on the Zap.
Step 7: Build a Second Zap to Bring Data Back
To bring signed documents back into your CRM, build a second Zap that runs in reverse. Your goal is to attach the completed PDF and audit trail to the HubSpot record.
Set SignWell as the trigger app using the Document Completed event. Then set HubSpot as the action step using Update Deal or Attach File to Record.
SignWell and HubSpot Automation Ideas
Once your accounts are linked, you can set up automated workflows that eliminate busywork for your sales team. Here are simple, practical Zaps you can create today:
- Update a HubSpot deal when a SignWell document is completed: Automatically move a deal from Contract Sent to Closed Won as soon as all signers complete the document.
- Update a HubSpot deal when a document is viewed: Move the deal status or create a task for the account owner as soon as a prospect opens the agreement.
- Create a SignWell document from a template when a new HubSpot company is created: Automatically generate a standardized vendor form or intake document whenever a new company record hits your CRM.
- Create a new HubSpot deal when a document is completed: Automatically spin up a new deal or renewal record when a client signs an initial agreement.
Use Cases for eSignatures in HubSpot
Sales, operations, and RevOps teams use connected eSignatures for…
- Sales contracts and order forms
- Non-disclosure agreements
- Proposals and statements of work
- Offer letters and new hire paperwork
- Vendor and supplier agreements
- Partner and reseller agreements
- Master services agreements
- Client onboarding forms
- Renewal agreements
- Scope change requests
Why SignWell is a Good Fit for HubSpot Teams
If you want to add electronic signatures to HubSpot, you usually don’t need an expensive and complex contract lifecycle management platform. Enterprise tools often force you to pay for expensive user seats and they require weeks of technical configuration just to send basic agreements.
SignWell is a popular DocuSign alternative that gives HubSpot teams a fast, affordable, and straightforward alternative. You get legally binding electronic signatures, clean document tracking, and easy template creation at a fraction of the cost. The signing experience for your clients is simple on any device so you can eliminate friction and close deals faster.
Try SignWell for free today to start sending and signing documents without the enterprise price tag.
You can also learn why SignWell is superior to other products in our list of the best electronic signature software.
Get Contracts Signed Without Leaving HubSpot
Your deals already live inside HubSpot, so your document signature workflows should too. By connecting SignWell through Zapier, you can eliminate manual data entry, keep prospects engaged, and log completed agreements automatically.
Sign up to get started with SignWell today or view SignWell pricing to find the right plan for your team.