

The SignWell MCP connects your AI assistant directly to your SignWell account. Instead of switching between your IDE, the SignWell dashboard, and Postman while you build a signing integration, you can send documents, inspect payloads, register webhooks, and check account state from inside the assistant you already use.
This guide walks through installing the MCP locally and connecting it to Claude Desktop, Claude Code, and Cursor. Everything here runs on your own machine. Your API key stays in your config. Document data goes directly from your assistant to SignWell’s API, with no third-party gateway in the middle.
Why The SignWell MCP Runs Locally
The SignWell MCP is designed to be locally hosted. That means the server runs on your machine, reads your API key from your own config, and makes requests directly to SignWell’s API. No intermediary platform sits between your assistant and your account.
A few reasons that matter for developers:
- Document data doesn’t transit a third party: With a hosted MCP, document contents, signer emails, and metadata pass through whichever gateway you’re using. That’s often fine, but it adds a vendor to the data path. For legal, healthcare, and finance teams who care about compliance postures like HIPAA, eIDAS, or SOC 2 scope, removing that hop simplifies the conversation. You only need to trust SignWell, not SignWell plus an MCP provider.
- Your credentials live in your own secret store: Claude Desktop encrypts API keys using your OS secret store (Keychain on macOS, Credential Manager on Windows). Claude Code and Cursor support environment variable expansion. Nothing gets written to a third-party database or cached in a remote session.
- No usage quotas from the MCP layer: Some hosted MCP providers count calls against their own plan limits (for example, Zapier charges per tool, per call). Local hosting means your only rate limit is SignWell’s API, and you track usage where you already do.
- You own debugging: When something misbehaves, you see stdout, you see the request and response, and you can run the server under a debugger. Hosted MCPs abstract those details away, which is nice until something breaks.
The trade-off is setup friction. You install Node, edit a config, and restart the client. If you’re reading this guide, you’re probably comfortable with that. If a less-technical teammate wants the same capability, point them at a hosted option.
What You’ll Need
Before starting, make sure you have:
- A SignWell account. The free tier works for testing (3 free signature requests per month, unlimited test mode usage).
- An API key from Settings > API in your SignWell dashboard.
- Node.js 18 or later is installed locally.
- One of: Claude Desktop, Claude Code, or Cursor.
Grab your API key first. In your SignWell dashboard, go to Settings, then API, then create a new key. Copy it somewhere safe. You’ll use it in every client setup below.
A note on test mode: SignWell supports a test_mode flag on API requests. Free accounts get unlimited test usage. Keep test_mode set to true while you experiment, then flip it off for real documents.
Installing on the Claude Desktop
Claude Desktop supports MCP servers in two ways: through its extensions directory or through a config file edit. Extensions are simpler. Config gives you more control.
Option 1: Desktop Extension
If SignWell has published an .mcpb bundle, install it through the extensions panel:
- Open Claude Desktop.
- Click Settings, then Extensions.
- Click Browse or Install Extension.
- Find SignWell in the directory, or select your downloaded .mcpb file.
- When prompted, paste your SignWell API key.
- Claude encrypts the key in your OS secret store (Keychain on Mac, Credential Manager on Windows) and enables the extension.
Open a new conversation. You should see SignWell tools available.
Option 2: Manual config file
If you prefer editing the config directly, or the extension isn’t an option:
- Open Claude Desktop.
- Go to Settings > Developer > Edit Config.
- This opens claude_desktop_config.json.
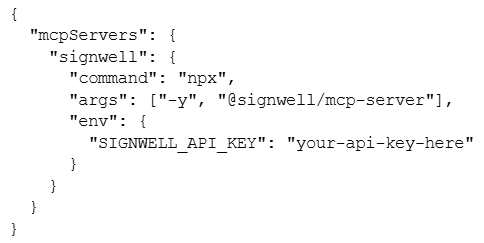
Add the SignWell server to your mcpServers block:
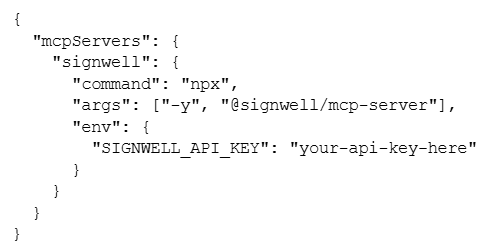
Replace your-api-key-here with your actual key. Save the file. Quit Claude Desktop, then reopen it. The SignWell tools appear in your next conversation.
Option 3: Environment variable
To keep your key out of the config file, set it as an environment variable and reference it:
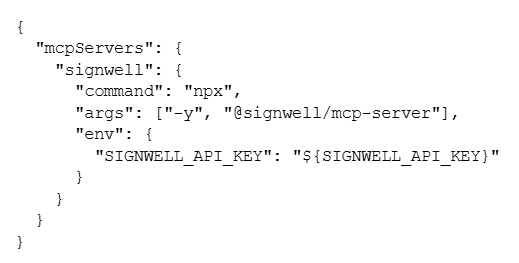
Then export the variable before launching Claude Desktop:
export SIGNWELL_API_KEY=”your-api-key-here”
This keeps the key out of any version-controlled files, which matters if you sync your config or share dotfiles.
Installing in Claude Code
Claude Code uses a CLI-first setup. One command registers the server:

Breaking that down:
- claude mcp add registers to a new MCP server.
- –transport stdio tells Claude Code this is a local process.
- signwell is the name you’ll use to reference the server.
- –env passes environment variables to the server process.
- Everything after — is the actual launch command.
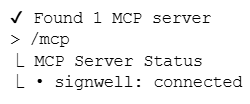
After running the command, exit Claude Code and start a new session. Run /mcp to confirm SignWell shows up:
For team use, Claude Code respects .mcp.json files at the project root. Commit one with environment variable expansion, never the raw key:
Each teammate sets their own SIGNWELL_API_KEY locally. No key ever lands in git.
Installing in Cursor
Cursor supports MCP through its settings panel.
- Open Cursor.
- Go to Settings, then MCP.
- Click Add new MCP server.
- Fill in:
- Name: signwell
- Type: stdio
- Command: npx -y @signwell/mcp-server
- Environment variables: SIGNWELL_API_KEY=your-api-key-here
Save. Cursor restarts the MCP connection automatically.
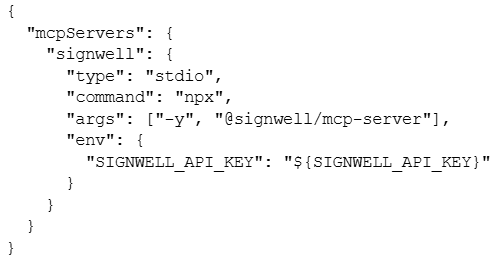
You can also edit Cursor’s config file directly at ~/.cursor/mcp.json:
To use the tools, switch to Cursor’s agent mode. The SignWell tools become available to the agent when they determine they’re relevant to your request.
Verifying It Works
Run a simple test in whichever client you installed. Start with:
Check my SignWell credentials
The assistant should call the get_credentials tool and return your account info. If you see your email, plan, and account metadata come back, the MCP is connected and authenticated.
Next, try listing documents:
Show me my recent SignWell documents
You should get a list of recent documents with IDs and statuses.
A third test, safer if you don’t want to send anything real:
Create a draft document in test mode using the file at https://example.com/sample.pdf with me as the only recipient
Draft plus test mode means nothing actually sends to a real signer. You can confirm creation works without generating real signature requests.
What the MCP exposes
Once installed, the SignWell MCP gives your assistant access to the core document operations it would normally reach through the REST API. Knowing what’s available helps you write better prompts and helps the assistant pick the right tool.
Documents:
- create_document creates a new document and optionally sends it for signing. Supports file uploads, template references, recipients, fields, and the test_mode flag.
- get_document retrieves a document and all associated data, including status, signer information, and audit trail.
- delete_document deletes a document and cancels signing if it’s in progress.
Webhooks:
- create_webhook registers a callback URL for document event notifications.
- list_webhooks returns all registered webhooks for the account.
- delete_webhook removes a registered webhook.
Bulk sends:
- list_bulk_sends returns the bulk signature requests associated with the account, which is useful for tracking high-volume campaigns.
Account:
- get_credentials returns account information associated with the current API key, which is useful for confirming which account you’re connected to.
These map directly to the REST endpoints at https://www.signwell.com/api/v1/. If a workflow needs something outside this set, you can still call the REST API directly from generated code. The MCP is the fast path for common operations, not a replacement for the full API.
Troubleshooting
A few things commonly go wrong:
- Tools don’t appear after install: Restart the client fully. Quit and relaunch Claude Desktop, exit Claude Code, start a new session, and close and reopen Cursor. MCP servers are picked up at startup.
- Authentication errors: The SignWell API uses an X-Api-Key header. If you get 401 responses, your key is either wrong, expired, or from a different account than you expected. Generate a fresh one in Settings > API and update your config.
- Node not found: npx needs Node 18 or later. Check with node –version. If you’re below 18, install a newer version via nvm or the installer at nodejs.org.
- The tool calls a timeout: The MCP server needs network access to reach api.signwell.com. If you’re behind a corporate proxy, set HTTPS_PROXY in the env block of your config.
- Rate limits: Free plans have low signature request ceilings. If the MCP starts rejecting creates, check your plan limits before assuming it’s a bug.
- It works in one client but not another: Each client has its own config location. Settings in Claude Desktop don’t affect Cursor, and vice versa. Re-check each config independently.
- Logs: If nothing else helps, check the MCP logs. Claude Desktop shows them in Settings > Extensions. Claude Code prints them when you run /mcp. Cursor surfaces errors in its MCP settings panel. Errors there usually point straight at the problem.
Moving To Production
A few things change when you go from “I set this up on my laptop” to “my team or product uses this.”
- Separate API keys per environment: Use different SignWell API keys for development and production. Never use a production key for local exploration. A leaked dev key is a nuisance. A leaked production key can send real signature requests to real customers.
- Test mode discipline: Until you’re certain a workflow behaves correctly, keep test_mode set to true. It’s easy to forget during exploration and accidentally send a real document to a real email. Test mode is the safety net.
- Rate limits and usage tracking: API calls count against your plan. If you expect to hit SignWell frequently through the MCP, check your plan’s monthly limits and upgrade if needed. Pricing is at signwell.com/api-pricing.
- Team configs: For team use, commit a .mcp.json with env variable references (never the raw key) and document the env var names in your README. New teammates set their own key and get a working setup without hand-holding.
- Scope what you expose. If you’re building an agent that should only read, not create, consider scoping which tools the agent can call at the prompt level. The MCP itself exposes every tool. Agent-level scoping is your responsibility.
What To Build Next
Setup is the easy part. The useful question is what to build with it.
Sending signature requests from Claude is one pattern. Debugging production issues through natural language is another. Building a complete signing agent using the Claude Agent SDK is a third.
We’ve covered those patterns and more in 7 developer workflows you can build with the SignWell MCP. Start there if you want code examples for real use cases.
For the full API reference, head to developers.signwell.com. If you hit issues during setup, reach out to our API support team.