

Helpful Summary
- Overview: This article explains how to create fillable PDFs, making document management more efficient and user-friendly.
- Why You Can Trust Us: SignWell is trusted by over 65,000 businesses for creating secure, fillable PDFs and managing eSignatures seamlessly.
- Why This Is Important: Fillable PDFs streamline workflows, reduce errors, and enhance document handling, benefiting any business.
- Action Points: Assess your current document processes and try SignWell to create and manage fillable PDFs effectively.
- Further Research: Visit SignWell’s resource page for more tips on using fillable PDFs to improve your document management.
Why Transform PDFs into Fillable Forms?
Making PDFs fillable can significantly improve your document workflows. Instead of static documents that require manual filling and printing, fillable PDFs allow users to complete forms directly on their screens. This saves time, reduces errors, and enhances the overall user experience.
In this guide, we’ll walk you through the steps of transforming your PDFs into fillable forms. We’ll also explore how tools like SignWell can simplify this process of document management.
But first…
Why Listen to Us?
As a leading provider of e-signature solutions, SignWell has a proven track record in simplifying document processes, including making PDFs fillable.

With a vast user base across various industries, we’ve consistently delivered reliable, secure, and legally binding electronic signature solutions. Our adherence to global standards like ESIGN and eIDAS ensures that your fillable PDF documents meet the highest legal requirements.
What is a Fillable PDF?
A fillable PDF allows users to enter information directly into a form, making it ideal for contracts, job applications, surveys, and more. Unlike static PDFs, which require printing, handwriting, and scanning, fillable PDFs are interactive, letting users type directly into predefined fields.
Creating fillable PDFs enhances digital workflows by simplifying data collection and automation. Here’s why they’re beneficial:
- Efficiency: Eliminates manual data entry, saving time and reducing errors.
- Convenience: Enables electronic form completion, streamlining the process for both creators and recipients.
- Legality: Supports electronic signatures, which are legally binding in many countries, and perfect for contracts and agreements.
- Accessibility: Facilitates online form management, which is crucial for remote work.
How to Create a Fillable PDF Using Different Tools
- Using SignWell
- Using Adobe Acrobat
- Using DocFly
Method 1: Using SignWell
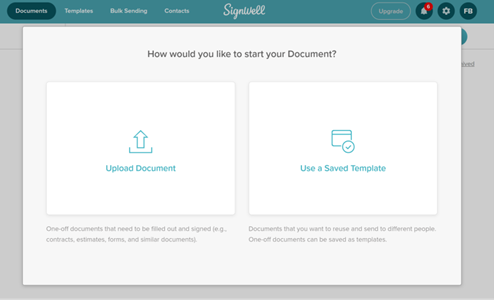
Step 1: Upload Your PDF
a. Log into SignWell: Begin by logging into your SignWell account. If you don’t have one, it’s easy (and free) to create a new account.
b. Upload Your PDF: Click the “Upload Document” button to upload a PDF from your device.
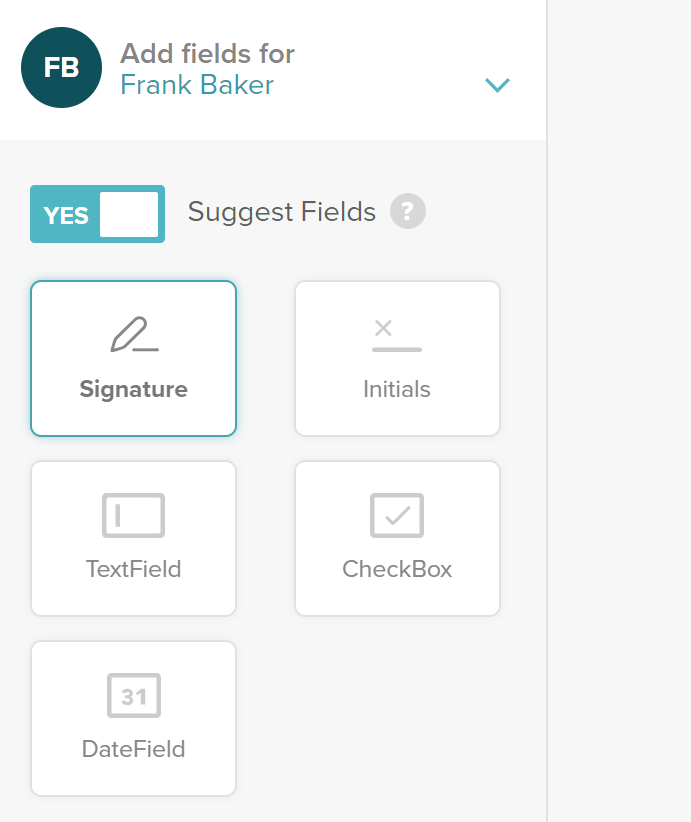
Step 2: Add Fillable Fields
Once the PDF is uploaded, you can add fillable fields using SignWell’s document editor. On the preview screen, you’ll see options on the left to add different types of form fields:
- Text Fields: For capturing information like names, addresses, or other textual inputs.
- Date Fields: Automatically formatted date inputs.
- Checkboxes: To provide multiple-choice options for users to select.
- Signature Fields: For capturing electronic signatures.
- Initial Fields: For documents that require multiple signatures or initials.
Step 3: Customize Fields
Adjust Field Settings: You can customize the fields to suit your needs. This includes:
- Making certain fields required so that the recipient must fill them before submitting.
- Adjusting the size of fields to control appearance.
- Applying validation rules to ensure proper inputs (e.g., email, numbers).
This ensures data accuracy and gives you control over how the form is completed.
Step 4: Share the Fillable PDF
- Send for Completion: After setting up the fillable fields, you can send the document to your recipients by clicking Send or by generating a signing link.
- No Software Required: Recipients can fill out the PDF and sign it without needing to download any extra software, making the process simple and seamless for both parties.
- Track Document Status: SignWell provides tracking features, so you’ll be notified when the PDF is viewed or signed.
Benefits of Using SignWell for Fillable PDFs
- User-Friendly Interface: SignWell’s intuitive design makes it easy for anyone to create fillable PDFs, eliminating the need for technical expertise.
- Mobile Compatibility: Users can fill out and sign PDFs on any device, including smartphones and tablets, enhancing accessibility and convenience.
- Customizable Templates: Save frequently used forms as templates, allowing for quick creation of new fillable PDFs without starting from scratch.
- Legally Binding Signatures: SignWell ensures that all eSignatures collected on the PDF are legally binding, making it ideal for contracts and important agreements.
- Track Responses: Monitor who has viewed, filled out, and signed your PDF form. This feature is particularly useful for businesses needing to follow up on agreements.
- Store Securely: Completed PDF forms are stored securely in the cloud, making it easy for you to access them whenever needed.
Method 2: Using Adobe Acrobat
Step 1: Open Adobe Acrobat
- Open Adobe Acrobat on your computer.
- You’ll need Adobe Acrobat Pro for creating fillable PDFs, as the free Adobe Reader version only allows viewing and filling out PDFs, not creating them.
Step 2: Open Your PDF or Create a New One
You can either create a new PDF or open an existing PDF that you want to make fillable.
- To create a new PDF, open a document (e.g., Word, Excel, or a blank PDF) in Acrobat.
- Go to File > Create > PDF from File to import a file.
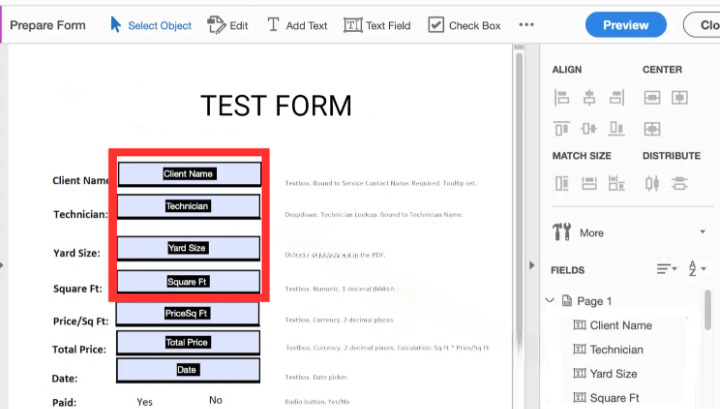
Step 3: Prepare the Form
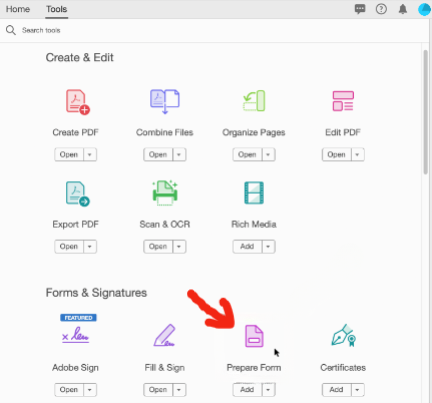
a. Once your PDF is open in Adobe Acrobat, go to the Tools tab.
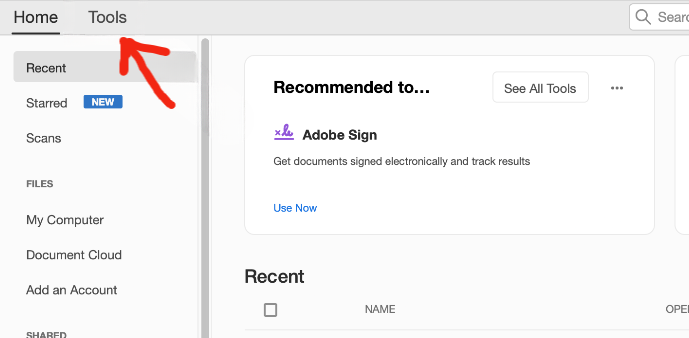
b. Select Prepare Form from the list of tools.
-
- If the file already contains fields that Acrobat recognizes as form fields (like underlines or tables), it will automatically detect and create fields.
- If you’re starting from scratch, you’ll be prompted to add form fields manually.
Step 4: Add Fillable Fields
a. In the Prepare Form mode, you’ll see a toolbar at the top with options to add different types of fields.
-
- Text Field: Allows users to enter text (e.g., name, email).
- Checkbox: Allows users to select one or multiple options.
- Radio Button: Allows users to select one option from a group.
- Dropdown List: Allows users to choose from a list of predefined options.
- Signature Field: Allows users to add a digital signature.
- Date Field: Allows users to enter a date.
b. To add a field, select the type of form field from the toolbar, then click on the PDF where you want the field to be placed.
c. Customize the fields:
-
- After placing a field, right-click on it and choose Properties to modify options like field name, appearance, or behavior.
- For example, you can make fields required or adjust font size and style.
Step 5: Set Field Properties
To ensure the form works as expected, you can configure field properties:
- General: Set the field name, tooltips, or make the field required.
- Appearance: Adjust fonts, colors, and borders.
- Options: Configure field-specific options, like text alignment, multiple lines, or spell check for text fields.
- Actions: Set custom actions for when the user interacts with the field (e.g., pop-up messages or triggering other fields).
Step 6: Test the Fillable Form
a. Once all fields are added, click Preview (at the top-right corner) to test the form. This lets you check that the fields are working properly and appear as expected.
b. If any adjustments are needed, go back to the Prepare Form tool to edit.
Step 7: Save the Fillable PDF
a. After you’ve tested and verified the form, click File > Save As and choose PDF.
b. Name your file and save it to your desired location.
Step 8: Share the Fillable PDF
Now that you’ve created your fillable PDF, you can share it with others via email, upload it to your website, or distribute it as needed. Users will be able to fill out the form using any PDF reader.
Challenges with Using Adobe Acrobat for Fillable PDFs
- Complexity: Adobe Acrobat has a steep learning curve, especially for users unfamiliar with its extensive features.
- Cost: Adobe Acrobat is a premium tool that requires a subscription for full access.
- No Native Signature Integration: While Adobe does support eSignatures, they often require additional steps or plugins.
- Resource-Heavy: Adobe Acrobat’s high resource consumption can slow down systems, making the process of creating and editing fillable PDFs time-consuming.
- Limited Collaboration: While Adobe offers the ability to create fillable forms, its collaboration features are not as robust as dedicated eSignature tools like SignWell.
Method 3: Using DocFly
Step 1: Import the PDF Document
a. Go to the DocFly website.
b. Click the “Click to upload your file” button or drag and drop your file into the designated area.
c. Once uploaded, the document will appear in a list format. On the right side, click the three-dot icon, then select Edit PDF.
Step 2: Add Form Fields
a. Your PDF will open in DocFly’s PDF editing interface. To make the document interactive, you’ll need to add form fields. Click on “Form Creator” on the top menu.

b. Types of Fields You Can Add:
-
- Text: For entering short lines of text.
- Paragraph: For entering longer blocks of text.
- Checkboxes: To select multiple options.
- Radio Buttons: To select one option from a list.
- Dropdown: For selecting from predefined options.
- List: For displaying and selecting from multiple items.
- Date: For selecting or entering specific dates.
- Signature: For adding digital signatures
- Initials: For adding user initials
Drag and drop the appropriate fields onto your document and position them for easy use.
Step 3: Customize Form Properties
a. Edit Properties: Customize each field to fit your needs. In DocFly, you can modify elements such as:
-
- Field name
- Placeholder text
- Background color
- Border color and width
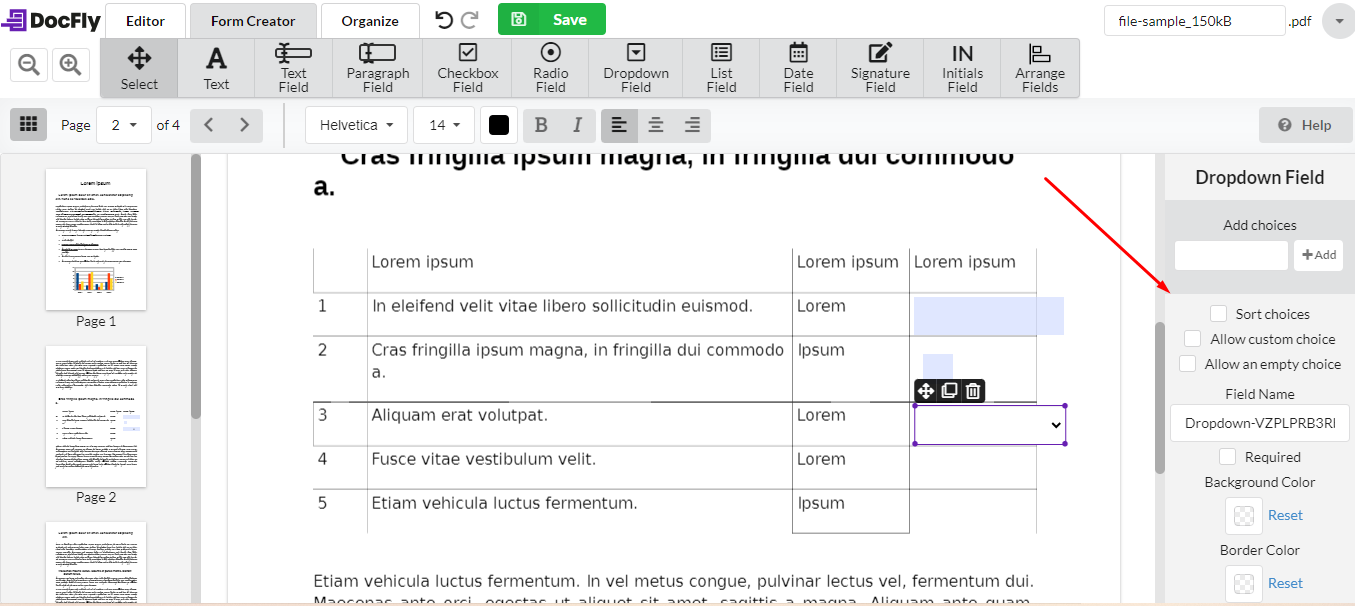
b. Special Fields: For dropdowns and signature fields, additional options may be available to tailor functionality.
Step 4: Save and Export Your Fillable PDF
a. Save the Changes: Once you’ve finished adding and customizing all the form fields, click the Save button located at the top of the interface to ensure your changes are applied to the document.
b. Export the PDF: After saving, the Export button will become visible. Click the Export button to download the completed fillable PDF to your device as a file.
Step 5: Test the Fillable PDF
- Open the PDF in a PDF reader or in any browser to make sure that the fields are fillable and work as expected.
- Also, test the form on different devices to ensure compatibility.
Challenges with Using DocFly for Fillable PDFs
- Limited Free Usage: Only 3 PDF edits per month for free; additional usage requires payment.
- No Advanced Collaboration: Lacks team collaboration and automated workflows like SignWell.
- Issues with Large Files: Struggles to handle larger documents, causing delays or performance issues during the fillable PDF creation process.
- Limited Security: Basic security features; lacks advanced encryption and audit trails.
- No Workflow Automation: No automated routing or reminders for document management.
- No Templates: Lacks reusable templates, leading to repetitive work.
Use Cases for Fillable PDFs in Business
Human Resources
Onboarding employees becomes easier with fillable PDFs for contracts, tax forms, and personal information collection. HR teams can also manage vacation requests, performance evaluations, and other essential documents more efficiently.
Legal
Law firms and legal departments rely on fillable PDFs for contracts, agreements, and client intake forms. Use SignWell to collect legally binding signatures and ensure compliance with industry regulations.
Finance
Financial institutions benefit from fillable PDFs for loan applications, financial agreements, and client onboarding. The ability to quickly gather signatures and validate information reduces errors and speeds up transactions.
Healthcare
Healthcare providers can streamline patient intake forms, consent forms, and insurance paperwork using fillable PDFs. This not only saves time but also reduces contact between patients and staff, creating a more efficient, contactless environment.
Education
Schools and universities can leverage fillable PDFs for student enrollment, course registration, and parental consent forms, simplifying administrative processes for both staff and students.
Real Estate
Agents and property managers can use fillable PDFs for lease agreements, tenant applications, and sales contracts, accelerating the signing process and ensuring all parties have timely access to essential documentation.
Why SignWell is the Best Choice for Fillable PDFs
Creating fillable PDFs has never been easier, and with tools like SignWell, you can streamline the entire process from form creation to securing legally binding signatures. Whether you’re handling contracts, applications, or agreements, SignWell offers a complete, user-friendly solution that saves time and ensures compliance.
Ready to elevate your document workflow? Sign up for SignWell today.